Monday, March 28, 2011

Canvas Scripture :)

My sister just had her first baby shower a couple of weeks ago, and I knew that I wanted to do something extra special for her sweet little bundle.  :)  I made STARTED making a cross-stitch birth announcement for my daughter before she was born and considered making one of those for the shower.  Since she's 11 months old, and I STILL haven't finished that, I figured it wouldn't be a good idea to start one for my little nephew.  ;)

I thought of a couple of ideas, and then I saw a painted canvas with the PERFECT scripture.  I immediately decided that this was the idea I had been waiting for... and I can't take credit for it.  Totally God, my friends. ;)  Here's the finished product.


I didn't take any pictures while I was making it, but it wasn't very difficult once I realized how I wanted to do it.  First I sketched up what I wanted on paper, then tried to design it a little on paint.  That's right--I used that super old program that is on every computer because it was all I had.  ;)  Don't worry--I have awesome skills with that program.  I mean, this picture below speaks volumes...


I drew this in '04.. so no, this was not recent, aaaaand I was 20 years old.  What can I say?  Easily entertained.  Don't judge me.  If I was THIS awesome then, you can imagine the talent I have for this program now.  ;)  I was going for the whole "Duck Hunt" (think Nintendo) dog here.  I'm not sure where the lion and deer came from.  I guess I just wanted more animals.  Who knows...

ANYWAY... here is the sketch I made...


This helped me decide which colors to use where, and things like that.  Next, I just used a pencil and ruler to measure the outside line, and then of course, all the other lines.  I didn't have a method for choosing how big the lines should be.  I just chose whatever looked right and made sure they were straight!  ;)

I used acrylic paint, and then just used a paint marker to write the scripture.  I knew it would be WAY too hard to do that with a paintbrush!  It's not perfect, but it was good enough for me.  :)  I'm planning on making one for my daughter out of girly colors, but I haven't decided on a scripture yet.  I want it to be one that she reads over and over again until it's "written on her heart".  :)  Whenever I get around to doing that, I'll post that one as well.

I'm really wanting to open an etsy shop, but I don't know if I have time to do that.  I'm thinking that for now, I may just finish the things I'm trying to make for my daughter (such as her cross-stitch!) and then maybe make a few things for the shop??  I don't know--it sounds super fun, but I also don't want something fun to become a chore...ya know?  Only time will tell... :)

Well, on that note--I hear the princess awakening from her nap.  In the meantime, I have done nothing but wash diapers and blog.  Oh well.  ;)

Have a happy week!!  :)


Wednesday, March 23, 2011

Butterflies :)

 "For I know the plans I have for you, declares the LORD, plans to prosper you and not to harm you, plans to give you hope and a future." - Jeremiah 29:11

I love butterflies.  I mean, really love them.  Anyone who knows me well knows that they’re one of my favorite things!  They’re always so happy!  I especially love the yellow ones.  They aren’t the prettiest ones I’ve ever seen, but they are always so happy!  :) 

Although I love to see them fly by, they’re special to me for a bigger reason.  God uses them to encourage me—especially when I’m feeling down.  I can’t tell you how many times I’ve been anxious about something or upset, only to see a butterfly.  I don’t just see them outside either!  There have been so many times I have seen various butterfly-related things inside as well.  It might be a magnet, a sticker, a picture… RANDOM stuff!  It’s like He places butterfly-related things around my house ahead of time, just because He wants to show it to me on a day I’m feeling down. 

Whenever I was pregnant, I was VERY afraid that something would go wrong.  I didn't have a reason to believe this, but it was my first pregnancy, and I was scared.  Well, one afternoon I started to pray.  The only part of the prayer that I had actually said yet was, "Lord, please protect my baby...", and a butterfly flew right in front of me.  I immediately whispered, "Everything will be fine."  I didn't even have time to think of saying that--it just came out.  I truly believe that was the Lord speaking to AND through me.  I was so very thankful for this promise, because each time I started to become afraid in the following months, I remembered His promise, and felt comforted.  Guess what?  I have a healthy little girl.  The Lord is good.  That is only one example of how God uses butterflies in my life, but I assure you--He sends them to me when I'm in need, even in the dead of winter.  One time I stepped on a butterfly hair clip (not mine, by the way).  The Lord provides for His children.  :)
  
You may be wondering what this verse has to do with butterflies--well, I guess it all goes back to the transformation of caterpillars to beautiful butterflies.  They start out as, well, let's face it... they look like worms.  NOT the prettiest sight I have seen.  Then, somehow, they build a cocoon to live in, and then they emerge as BEAUTIFUL butterflies!  God transforms them from something not-so-pretty (in my opinion at least) to something amazing.  He has a plan for them from the beginning.  :)  This verse is special to me and gives me comfort when I'm feeling anxious about things that are going on in my life--which has happened a LOT this past year!  In the past year, I had a baby girl, moved to a NEW (old) house in a NEW town when she was only two months old, had stomach problems for months, which led to my gallbladder being removed and then finally being diagnosed with a mild case of Crohn's Disease.  Whew.  Don’t get me wrong… having my baby girl and moving to our new house were both WONDERFUL things, but it’s still really hard to adjust to being a mom, while moving away from everything familiar in the process!  I REALLY needed some butterflies and the knowledge that God had a plan for me!  

That's how our lives are sometimes, or maybe even a lot of the time.  Things are difficult, and we can't see what the future holds.  Well, God can.  He has a plan for our lives, and in this verse He says that they are plans to give us hope and a future.  We may not always like the plans because God thinks differently than we do (thank goodness!), but He knows best.  He can see the WHOLE picture, while we can only see a small part.  
  
Life is going to be difficult at times.  Things aren't always going to go our way.  However, just because things are hard, does NOT mean that He has abandoned us.  I truly believe he ALWAYS has a plan, even when it feels impossible to understand.  So, when you find yourself in a situation that seems hopeless, I urge you to remember this verse and remember that HE has a plan for you--plans to give you hope and a future!  :)  

P.S.  If you find yourself in a situation right now that seems hopeless and need somebody to talk with, please feel free to leave me a comment with your email address.  I don't have all of the answers by ANY means, but it would be my prayer to help encourage you!  :)  

Linking up to Not Just a Housewife

Monday, March 21, 2011

Planning Board :)

Happy Monday!  It doesn't look very happy outside here--all cloudy and gloomy, which would be great if it were raining (we sure do need it!), but it's just cloudy.  Oh well, *sings* the...sun will come out... this afternoon..  :)

Okay, now moving on from the silliness..

Remember how I talked about wanting to be more organized?  Well, I LOVE making lists.  By that statement you would really think I was totally Type A, but I'm really not.  I probably drive Type A people nuts sometimes! The reason I like lists is because it helps me to focus on what I NEED to do.  I started making lists in college whenever I'd feel really overwhelmed with all the homework and studying I needed to do.  It really helped!  Now that I'm a mama, I can't tell you how many times I think of stuff I need to do after my daughter goes to sleep, only to realize that I can't do that specific task because it's too loud or it's something I need to do in her room, etc.  Then, when she wakes up, I forget about it until her next nap.  It's a vicious cycle.

A few months ago, I decided I wanted to take a big step in being more organized.  I began planning my menu for supper each week.  I don't plan breakfast or lunch--those are always simple and easy.  I just found that I was always stressed about fixing supper, because I wouldn't decide what to cook until around 4:00, which meant I didn't have anything thawed out!  So, now, I sit and write down a bunch of different supper ideas on a sheet of paper.  Then, I write them on a calendar, making sure to reserve certain days as 'leftover days' when I know there will be too much the night before.  Not only do I get a night off from cooking (though I do love it!), but it saves some money too!  :)  I'm also trying to make only one big grocery trip a month by planning for the whole month and then shopping for what I need.  I'm hoping this will save money as well.  Anyway, I'm chasing a rabbit...

I saw this great idea for a planning board online, and decided to make one myself!  It includes a menu for the week, to-do's for each day, and a prayer list.  At first, I just used a giant dry-erase board I already had, but I quickly realized that I would have to re-draw all the lines constantly, so I moved on to a different idea I found online and made this.


This is just a regular picture frame, so now I can write on the glass with a dry-erase marker, and it comes off without any problems!  :)  It turned out much cuter than I hoped for because I had SO many scrapbooking stickers that made it super easy!  :)  Of course, you don't have to use scrapbooking stickers.  You can always draw things on by hand or print something off the computer--whatever floats your boat.  ;)

Wanna make one?  You know the drill...
If you're using the materials I used, you'll need:

  • A picture frame:  It could be just about any size, as long as it's big enough to write everything on!  
  • Two sheets of scrapbook paper (12x12)
  • Letter Stickers
  • Line Stickers (My only advice is to look in the scrapbook stickers section)
  • Pencil
  • Tape
  • Ruler
  • Any other cute stickers to decorate!
  • Dry-erase Marker
Alright, let's get started, shall we?  My frame is a 12x16 from Walmart.  I got it for $4!  Hard to beat that, my friends!  I really liked this frame because it has a super small frame going around it--you can barely see it!  I think this makes it easier to write on as well.  I chose a larger frame because I wanted to make sure that I had enough space to write down everything.  (Disclaimer:  Some of the pictures don't look very good because of the lighting!)


Next, I chose two colors of scrapbook paper, and cut them to fit the frame.  I had to cut a SMALL strip off one of the edges to make them fit the way I wanted.  I used one whole sheet, and then cut a small section off the other sheet (I'm guessing about 5 inches wide or so) to fill the rest of the frame.  I just used the insert sheet above from the frame to make sure I had everything the correct size and then taped the two pieces together on the back.  (Does that make any sense???)


Then, it's pretty on the front.  :)


Next, I took my ruler and measured how big each column should be in the light blue section.  That was easy, because the paper is already 12x12, so each section was 4 inches wide. 


Then, I measured out the lines for the days of the week.  Remember you actually need EIGHT slots for this, including the top section that says "Supper", "To-Do", and "Pray".  They measured out about 1 1/2 inches each.  (Random thought:  In case you don't know me, I am married to a wonderful (and super cute!) man--just wasn't wearing my ring at this moment!)


Once all my lines were drawn, I took my line stickers and placed them over the horizontal lines on the light blue paper.  They weren't long enough to cover the whole length--I'll get to that later.  They actually didn't even cover the length of the light blue paper, but I started from the right side, knowing that I had a plan to cover the left edges.  (Again..it'll make sense soon!)  I only had enough stickers to cover six lines, so I decided to use a different kind of sticker for the top.


Next, I cut more line stickers (for lack of a better term) in sections to place on the dark blue paper and to cover the top line all the way across.  To add a bit of flair (and pink--because it's my favorite!), I added some pink stickers with butterflies to create a border.


You may notice that my pink stickers didn't quite reach to the edges.  I'll take care of that with some lovely butterfly stickers!  (I'll have to share my love for butterflies story another day--they're VERY special to me!)  After I added the butterflies, I put on my letters.  I DID run out of a couple of letters, which was always a problem when I was scrapbooking.  Have no fear though--we can always improvise!  The 'r's in supper and pray are actually 't'!  I just cut them down to make them look like 'r'.  Nobody will ever know!  Except in my case, everyone who reads this will know.  Oh well.  ;)


I have people under the prayer section, but didn't include it to protect their privacy.  The thing I love about the prayer section is that it reminds me to pray for specific people!  :)

And there ya go... y'all have a happy week!!  :)

P.S.  In case y'all have noticed, I am NOT good at explaining some things.  So, if something just doesn't make sense at all, just ask and I'll ATTEMPT to explain in a different way.  ;)

Sunday, March 20, 2011

I Heart Crocheting!

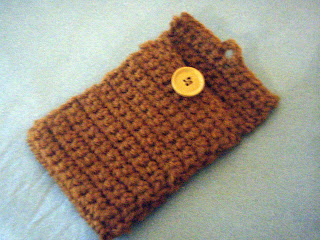
Some people think I'm growing old too quickly because I've picked up this new hobby of mine -- crocheting.  You can think what you want, but I'm loving it so far!  I've been trying to find a hobby for me being a stay-at-home mom that doesn't take a lot of money but still can be practical and useful, and I came across crocheting after my cousin's wife showed me a baby beanie hat that she had made for her niece for Christmas.  ADORABLE!  It even had these cute little bows you could switch out for different outfits.  So, I set out to learn how to crochet!  I will say, I was really (a little too much probably) optimistic in the beginning that I would just pick up this art like a pro but found it to be really frustrating instead.  But, I continued working at it and I'm slowly improving.  I've made a scarf, a baby blanket (which isn't perfect at all, but for my first attempt, I'm pleased with myself), and this new little creation:


It is supposed to be a cell phone holder, but it can probably be a whatever-kind-of holder you want it to be. If you make it longer, it can be a holder for your glasses.  And it was really easy!  If anyone is a crocheter out there, all you do is make a "scarf-like" piece about 10 inches or so long, then fold it over and sew up the sides (of course, you have to make the button hole as well).  The hard part for me was the sewing up the sides, which is probably not professional looking at all, so I'll have to work on perfecting that.  But for my first project other than just a blanket/scarf, I'm happy with it!  I love this hobby because it gets me away from the computer, technology, and just doing something that has been done for centuries.  Now, to my next project... 

~ Shawna

Thursday, March 17, 2011

Seeing Our Heavenly Father Work

Being the person our Heavenly Father wants us to be can be so trying sometimes.  The big stuff (drinking, drugs, affairs, etc) have never been really tempting to me, but just because we don't engage in the "big stuff" doesn't mean we're being the person God wants us to be.  I've struggled with being focused on a daily Bible study, and I could use the excuse of having a young child, but I think it is more of my own discipline and drive.  Sometimes I wonder if God really has a plan for our lives and if being really disciplined in my study/prayer life will really make a difference.  I've needed something from God lately to just know that I'm on His mind and that He truly does care about me and the little things in life.  Well, today I've seen Him work in the little things in my life:

Our Father truly does care about our finances.  I'm not saying that He will always give us more than we need, but He will give us what we need if we are focused on doing right with our money and being right with Him.  Recently becoming a stay-at-home mom and not a working mom has caused our finances to be a lot tighter.  However, so far, we've continued to be able to save a little every month, which is great because we hope to buy a house in a little over a year.  However, while sitting and eating dinner last night, my husband and I were talking about some changes we're going to have to make within our budget and it may cause us to not be able to save that amount that we've been able to save thus far.  It was hard for me to accept but I knew the reasoning behind it was well worth it.  However, the very next day, I go for a job interview and got a part-time job as a teacher at a Mother's Day Out program, in which my child will even be in my classroom.  The amount that I will bring in doing this will be about the amount that we were saving before on a monthly basis.  I won't have this job during the summer but I know God will provide somehow if it is in His will for us to save that money.  God's promise to provide is true.  He will provide for His children.  

God also truly cares about our walk with Him.  Some of you know that my goal for this year is to memorize Colossians.  I haven't been very good the past few weeks at my memorization due to traveling, and last night, I thought to myself "What is the point in it?  Will it really make a difference in my life?  I might as well just quit.  I don't have the accountability I need to be motivated to do this."  I really thought about quitting this goal of mine.  Well, today on FB, the website where I got this idea to memorize Colossians puts up a comment saying -- 
"Committing a great truth to memory is admirable; committing it to life is wisdom." ~William A. Ward .... Praying as we memorize Colossians to live His truth... Press on into Him...
 What a smack in the face that was!  This website rarely puts up anything on FB, so to see that today was God's way of saying "Do this.  You won't ever regret it."  So, I have some catching up to do, but I know there is a reason behind it and I'll be blessed having these scriptures deep in my heart, soul, and mind.  God truly wants us to walk with Him on a daily basis, and He wants a true relationship with us.  Knowing God's Word helps us to know God.  
 I hope you are able to see God working in your life this week.  He truly cares about each and every one of you.  Sometimes it's hard to see, but trust that His promises are true.  He loves us and will never forsake us -- He promises!  
~ Shawna

Tuesday, March 15, 2011

Nursery Wall Letters :)

Happy Tuesday!!  :)

When I was pregnant, I REALLY wanted to find some cute letters to spell out our daughter's name on her wall. I looked on ebay and found some super cute wooden letters that were much more than I wanted to spend, and then I found some letters that you can stick to the wall that I liked as well.  Those were cheaper, but I feared they wouldn't stick very well to her textured wall.  So, I decided to take matters into my own hands and make some letters myself!  After looking around for ideas online, I found a method where you can use material to cover the letters.  Since I had leftover material from her curtains, I decided to try it out.  They turned out SUPER cute and I love them.  The best part?  They were cheap AND easy to do!  So, a few weeks ago I decided to make some letters for a special little boy that is coming into the world in a couple of months!  (This isn't my child, by the way)  ;)

Each letter cost me $1, and I only needed a very small portion of material.  So, it was VERY cheap to make! :)  Gather your materials... I'll wait.


You will need:
  • Wooden letters:  These came from Hobby Lobby, but I got the letters for my daughter's room from Walmart
  • Enough material the cover each letter:  I can't be specific about this because this will obviously vary depending on the size and amount of your letters!
  • Paint to match the material:  I just used good ol' acrylic paint.  
  • Sponge brush/paint brush
  • Pencil
  • Scissors
  • Tacky Glue:  You may be able to use Modge Podge or some other type of glue, but this is what they had a Walmart for a good price, so this is what I bought!  :)
First, take your letters and paint the back and sides.  You don't actually have to paint the back if you're hanging them on the wall, but I think it looks nicer.  :)  I forgot to take a picture before I painted the letters, so just use your imagination.  ;)


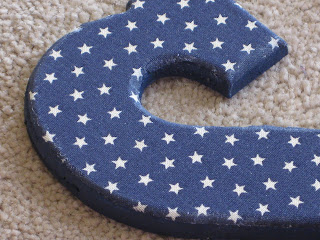
I'm sure you'll notice that the paint job looks a little messy, but I did that on purpose.  No really, I did.  ;)  The edges of these particular letters are curved, and I wanted to make sure that I covered all of the wood that will be exposed.  The material is going to cover those messy edges, so nobody will be able to tell that it looked like this at the beginning.


I realize that you don't necessarily need to see that I painted the back of the letters, but pictures make things more fun, don't they?  :)  (Note: On my daughter's letters (below), I didn't bother painting the back because the light color of the paint was close to the natural color of the wood.  You can't tell at all since her letters are hanging on the wall.)  And no, her name is not "Li", I just took two random letters from her name to show you a different sample.  ;)


Next, place your letters face down on the back of the material, and carefully trace around each letter.  These letters were a little tricky to trace because they were so curvy around the edges, but I just angled the tip of the pencil in towards the letter a little more, and it turned out fine.  After you finish tracing, cut the shapes out of the material.  


After I cut it out, I like to take the material and place it over the letter to make sure it matches up well. 


Now, take your Tacky Glue and put some all over the front of the letter.  Do one letter at a time.  You only want a THIN layer of glue, so don't overdo it!  I just squirted a thin line of glue over the letter and spread it out with the sponge brush.  Once your letter is covered with the glue, take the material and gently place it over the letter.  Make it match up as closely as possible before pressing it down.  Keep in mind that you can get wrinkles easily, so just smooth them out starting front the middle of the letter.  The material may get a little damp from the glue, but it will dry.  (This is one of the reasons you don't want too much glue!)

(I apologize for the quality of the picture below, but it's the best I have!)  Once you get the material stuck down, you may notice your edges sticking out.  (If your letters aren't curved on the edges, this won't be as big of a deal)  Don't fret--we can fix this.  :)


At this point, I recommend getting a paper plate and putting a small amount of glue on it.  Now, take your sponge brush and dip the tip of it in the glue.  Then gently brush the edges of the material (on top of the material) with the glue as well as the sides of the letters.  Sadly, I didn't get a picture of this, so I may have just confused you!  Then you want to press the edges of the material down towards the wood.  I ran my thumb from the material down towards the wood, across the seam of the edges to get a smooth look.  You may have to do that a couple of times.  Just do this across all of the edges.  (Again, if you have edges that aren't curved, this step may not be necessary at all!)  Below you'll notice that the right side of the letter has smooth edges while the left side is still sticking up.  Doing this makes a HUGE difference, as you can see.  :)  Don't worry if you leave behind some dried glue on the paint, we'll take care of that later.  ;)


By the way, I had a little bit of trouble pushing down the edges on the curvy parts of the letters.  If this happens to you, just take your scissors and make a tiny slit or two on the edges of the material to make it fold down more easily.  


Once you finish gluing down all of the edges, you can repaint the sides of the letters.  This may not be necessary, but I did this because you could see the glue on the dark blue paint.  


Then, well, you're done!


(I am not a photographer, but sometimes I pretend that I am and take pictures like this!)

You don't have to make these for a nursery, you could also spell out your last name for a cute decoration in another part of your house, or spell out whatever you'd like, depending on how much money/work you want to put into it!  Just have fun!!  :)

Have a happy week!!


Link Party :)


 Nap Time Crafters Link Party :)
Lil Blue Boo / Dharma Trading Design Challenge

Friday, March 11, 2011

Onions, Onions, and More Onions!

Probably one thing you have learned so far with this blog is that Jennifer is the creative one out of the two of us (although I am working on a crocheting project!).  However, I do LOVE looking at crafty blogs, so maybe I'll become more creative as time goes on.  This blog, as you can probably tell by the title is about onions!  And honestly, right now, my eyes are still recovering from my battle with the onions.  This might also be an opinion review over a new kitchen gadget I have.  I'll explain about it below.

So, a few months ago, onions were pretty expensive...like almost $2.00 a pound!  Today, I found them for 8 pounds for $1 -- oh, how it put a smile on my face!  We cook with onions a lot around here.  But don't worry -- we're good about brushing our teeth!  I could have gone crazy with the onions and bought lots more than what I did, but I refrained.  I ended up buying about three pounds for about $0.40.


This is the new kitchen gadget I have.  I actually came across it at my mother's house.  She got it at a garage sale who knows when and had forgotten she had it, so she just gave it to me.


A little side note:
I used to HATE peeling onions (and even now, they're not on my top 10 favorite things to do in the kitchen), but I've learned a better way to peel onions.  It is pretty much a "duh" thing, but just in case you need a "duh" moment and you hate peeling onions too, I'll help you out.  First, cut off one (or you can do both) ends of the onion.


See...I put pictures up to help ;)  Next, cut it in half lengthwise. 


Then, just peel the outer skin off!  Much easier this way.  Saves me a lot of frustration...even though I should have thought of this way earlier.  So, if you are like me and sometimes don't think of the obvious, hope that helps!

So, I put the onion halves in the chopper and chopped away and came out with this amount in which will be stored in our freezer:


I actually thought I would have more from six onions, so I may have to go buy some more tomorrow.  Now, when I need chopped onions to throw in a recipe, they will be ready to go!

My review on the product:  I definitely wouldn't have paid more than a few bucks on it.  You have to used some strength to push the handle part down to completely chop the onion.  My electric chopped probably can do it just as good for less energy on my part.  However, it does say that that it can do potato fries, so I may try it out.  It also has another attachment that cuts up the veggies finer.  So...that's my opinion.  If you can get it for just a few bucks (or free like I got it) and you have room for yet another kitchen gadget, then go for it.

One more thing -- I got the onions from a Hispanic market.  We have one really close to our apartment.  I never thought about doing any of my shopping there, but we get their flyer in the mail and they have really good deals, especially on vegetables.  They often have specials for avocados for 8-10 for $1, and of course, specials on onions.  It's also where I get my 30 count eggs for $1.88.  So, anyways, if you have a Hispanic market close by, it may not hurt to check it out!

Wednesday, March 9, 2011

Birthday Onesie

Howdy :)  I mentioned in my previous post that I was working on a onesie for my daughter's first birthday.  Well, can I just say, TA-DA!!!!


I just finished!  It took a bit of time, but it was actually pretty easy.  Wanna make one too?  Well, allow me to show you.  :)  (Disclaimer:  This is FAR from perfect, and was my first attempt.)

First, you want to gather your materials.  You'll need:


  • A onesie (duh): I bought mine from Walmart (Faded Glory brand) for $2!
  • At least two different fabrics: I only bought 1/8th of a yard of each (37 cents each!), and I have enough to make several more of these!
  • Wonder-Under
  • An iron
  • Scissors: You want some good scissors that will cut easily through the fabric.
  • Pencil
  • Cupcake Template (I used the one on THIS page)
  • Letter Template: I just used Microsoft Word and typed up 'o n e' (you want a space between each letter to make it easier to cut out).  I used the 'Arial Black' font, and made it bold.  I made one set size 130, and another set size 150.   (This will make more sense later!)
  • Ric-Rac (optional)
  • Puffy Paint (optional, though I don't recommend... you'll see why)  ;)


Next, take a small quarter of each piece of material.  I would recommend cutting out a section around 4x5 in. You just want to make sure you have enough material to cut out the letters and the cupcake.  Once you cut out the material, place it on the wonder under.  The wonder under has instructions that will help you with this part.


After you iron the material onto the wonder under, turn it over and trace your templates onto the back.  You need to make sure that you trace your letters backwards so they will come out correctly when you cut them out!  :)  (Note: When I cut out the 'one' template, I didn't bother cutting out the center of the 'o' and 'e'.  I just drew it on after I traced it.  It saved a little bit of time and made things easier for me!)


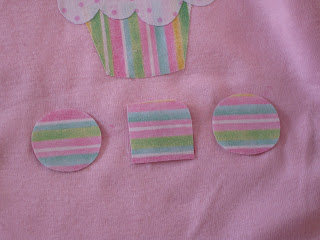
Next, cut out the cupcakes and letters.  If you want, you can also make a little candle to top the cupcake.  It was easy for me to do with this striped material!  I just cut out one pink stripe, then cut a little diamond shape out of the yellow stripe for the flame.  I made a 'u' shape at the bottom of the candle just to give it more of a 3D look once it's on top of the cupcake...you'll understand what I mean later...I hope)  ;)


When cutting out your shapes and letters, you can just fold the 'o' and 'e' in half to CAREFULLY cut out the centers of the letters.


Now, take the bottom section of the cupcake and iron it on to the onesie.


Then add the top of the cupcake.  The bottom layer may show through a little bit if your top color is lighter, but it isn't a big deal.


Next, add the candle, then the flame.  Make sure you don't try to save time by adding too many things at one time.  You want to make sure that the items are EXACTLY where you want them to be before you iron them on, and it's easier if you're just working with one part at a time.


Now add your letters, one at a time.


If you want to add Ric-Rac, arrange how you want it and pin it on before you stitch it.  You can also put some at the neck or on the back, wherever you want!  I'm assuming you could use a sewing machine, but I just hand-stitched mine.  I didn't take a picture of this, but it looks nicer if you fold the end of the Ric-Rac underneath when you're sewing to make a cleaner edge.


In the next picture, you can see that I stitched on the Ric-Rac, and then painted around each letter.  This is why I don't recommend the paint, unless you're just awesome at this kind of thing, which I wasn't.  ;)


It looks alright, but I liked it much better before.  Plus, it's difficult to do this!  So, I ended up pulling off the letters after the paint dried, but there was still paint on the onesie.  To cover it up, I decided to make a set of letters in a bigger font, and then use the smaller font to layer on top.  I know that's confusing.  That's why I have pictures!

Notice that on the larger font, I didn't cut out the 'n' or 'e' completely.  You'll see why below.  I cut out the smaller font on one print of material, and the larger font on the other print.


After I cut the letters out AGAIN, I placed the larger font on the onesie to cover up the paint that was leftover from my mistake.  Again, make sure you iron them on ONE AT A TIME!  :)


Next, iron on the smaller font letters on top, and then.... *drumroll*


Hooray!  :)  You can see my imperfections when it's up close like this, but you can't tell on the actual onesie unless you're really looking for them!  :)


See??  I told you it wasn't that hard, plus, it's a lot easier if you don't mess up like I did!  :)  Feel free to leave a comment if you have any questions.  I'm sure some of the things I said are as clear as mud!  Have fun!!


This blog below has a lot of links to cool projects if you're wanting some inspiration! :)


Lil Blue Boo / Dharma Trading Design Challenge
Nap time Crafters Link Party! :)