Showing posts with label Baby. Show all posts

Friday, July 29, 2011

Curtains Tutorial

TGIF!!!  :)  (I miss those shows...)


Last Saturday, I guest posted on Not JUST a Housewife, and so here is the posting from there.  :)


Before M was born, I decided to make some girly curtains for the nursery to add some pink to the neutral Winnie-the-Pooh theme we have going on.  I started on them a year and a half ago, finally finished them about month before she was born, got to see them hang in her nursery in their beautiful glory for two months, then we moved to a new house.... where she now has two small windows instead of one big one, so they didn't fit.  This equals a sad Jennifer.  I was determined to fix them though.  Allow me to show you the progression..


We went from this (at the old house)...


To this (at the new house)...


I had to do some brainstorming, and with the help from a sweet lady at our church, we came up with a plan.  I ended up splitting each curtain into two pieces, and then making a valence because the curtains weren't tall enough to cover the window on their own.  I also had to purchase some more coordinating fabric to add a couple of more panels (two for each window), to go in between the pink curtains.  It made the curtains fuller, and made them look better than I ever even imagined!  I love them!


Want to make some cute curtains for your little one (or yourself)??  Let's get started!


I'm working with a window that is 52 x 35, so that is what I'm basing all of my measurements on.  Make sure you adjust according to your window size!  :)


You will need:

  • Four 55x22 inch pieces of fabric (Two in one color, and two in a coordinating fabric)
  • Two 20x5 inch pieces of fabric (for tie-backs)
  • Two 36x5 inch pieces of coordinating fabric (for tie-back ruffles)
  • Two 5x2 inch pieces of fabric (for tie-back ends)
  • Coordinating Thread
  • Sewing Machine
  • Scissors
  • Pins
  • Pencil
  • Measuring Tape
  • Lace to accent ruffles (optional)
  • Keep in mind that if you want ruffles on your curtain panels, you will need extra material.  You will also need extra material for the valence, which I'm not including in this tutorial.
1)  Once you have your material measured and cut, go ahead and hem the sides of the curtains.  I did a double folded hem, because I think it looks nicer.  :)


If you aren't adding a ruffle, then go ahead and hem the bottom.  If you're wanting to add a ruffle, then you can get an idea of how to do that when I show you how to make the tie-backs.


2)  Once all of the sides are hemmed, go to the top and just do a raw edge hem, because it will be hidden later.


Far from perfect, but you can't tell when they're hanging! :)
3)  Now fold it over 3 inches or so and pin it.  Stitch it close to the edge.


4)  Now, you need to stitch another line for the rod to go through.  You don't have to do this step, but it makes it look nicer.  I allowed about an inch and half for the rod, which works, but it's a very tight fit.  So, I would suggest going two inches or so from the original stitching line, depending on the size of the curtain rod you'll be using.


Then you're done with the simple panel!  :)


Now for the tie-backs...(I'm going to refer to each piece that I'm using by color, to avoid confusion)

5)  Take a 20x5 inch piece of pink material, and hem the short sides and the top (raw edge hem).


6)  Take a 36x5 inch piece of beige fabric for the ruffle section, and do a double folded hem on the short sides and bottom of the fabric.


7)  Next, do a long stitch across the top of the beige ruffle fabric, and then gather it to make it a ruffle.  You want to make sure it is gathered to match the length of your pink fabric, above.


8)  Now, lay the two pieces of fabric together, right sides facing each other, and pin the fabric together.


9)  Stitch across the top.  (Note:  If you want to place a ruffle on the actual curtain panel, just leave the bottom un-hemmed, and follow steps 6-9 with the appropriate amount of fabric needed.)


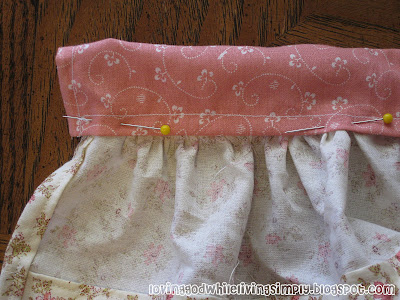
10)  Fold the top of the pink material over the raw edge of the ruffle, and stitch.


You're almost done!  Now you just need to make the end of the tie-backs!


11)  Take a 5x2 inch piece of pink fabric, and fold the edges over, so they meet in the middle.  Then, fold the material in half, and pin.  Stitch.


12)  Take your ends, and fold them in half so they form a hoop.  Place the ends into the opening of the tie-backs, and then stitch.


All done!!  :)


If y'all have any questions, I'll do my best to answer them!  Have a fabulous weekend!!  :)


Wednesday, July 6, 2011

For my fellow Mama's..

I remember how naive I was before M was born.  I knew motherhood would be difficult.

Sure, I would be short on sleep.

Sure, I wouldn't get to sleep late anymore.

Sure, I would have to take care of this tiny little person 24/7.

That was pretty much the extent of my knowledge.  Sometimes I wonder if I would have rather known how difficult those first weeks would be, but I doubt it.  You can't understand until you experience it yourself, and as they say, ignorance is bliss!  What new pregnant mommy wants to hear all the difficult stuff that she'll be facing??  I just wanted to look at all the adorable little dresses and hair bows and imagine how fun it would be to dress M up!  :)

On a side note, if you ARE a pregnant mommy, or a new one at that, know that it DOES get much easier.  It's a difficult adjustment at first, or at least it was for me, but then you begin to get in the swing of things, and watch this tiny person develop their own adorable personality.  :)  M is only 14 months old, but I'm already beginning to understand that motherhood is the most challenging, and most rewarding thing that I'll ever do.  One of my friends told me that when I was a newlywed, while I was babysitting for her.  :)  It's so true, and I'm still in the beginning.  :)  So, if you're in those early stages and need somebody to talk to, please don't be afraid to contact me.  I'm no expert by any means, but if I can help at all, then I'd love to be a friend.  :)

All that being said, I'm just curious about what y'all think are the most important things to remember when you're a mama.  What do you tell yourself on the hard days?  What kind of 'motto' do you try to live up to?

I guess it's only fair for me to share my thoughts.  My (our) ultimate desire is to raise our child(ren) to know and love the Lord.  I really can't emphasize enough how important that is to us.

I try to remember that having M is a huge blessing that the Lord didn't have to give to me.  I try to keep things in perspective by knowing that when she makes a big mess, it isn't the end of the world by any means.  I try to remember all the women who would love to be in my shoes with their own little one.  When I just want a moment to myself to get out of the house, I try to remember that it's a blessing to stay home with her while my husband works.  I try to remind myself that these days will pass very quickly, and I'll miss them very much.

Motherhood is a precious gift, and I'm thankful that God has blessed me in this way.  I only pray that He'll give me the wisdom, unconditional love and grace to raise her, and any other children He blesses us with, in a way that will please Him and help them to know Him.  :)

Saturday, June 18, 2011

Cloth Diapers

Diapers are expensive over time, even if you buy the cheapest kind each time.  It's just how it is.  Whenever I use a disposable diaper, sometimes I'm tempted to leave it on as long as I can to get my money's worth.  The problem with this, though, is that it can lead to the evil diaper rash.


Before I had M, as I was stalking reading another blog, I found a post about cloth diapers.


I'm not talking about the kind of cloth diapers that your momma used...  (although I'm sure there are still people who still like to use them.)


cloth diaper myths
Picture Source
I'm talking about these...


Pic Source

Being the girly girl that I am, I will admit that I was originally attracted to the idea because of their cuteness.  :)  My husband and I started researching them and discovered that you can save a TON of money going this route.  Yes, you have to pay that first painful amount to buy the cloth diapers, but then, you don't have to keep paying to buy more every other week or so.  We ended up getting BumGenius Diapers One-Size Diapers.  They are supposed to last through potty-training (one-size adjustable diapers), and we should be able to use them on multiple kids.  


We started using the cloth diapers when M was around 4 months old, just because newborns are ALWAYS dirty or wet, plus we had diapers from baby showers.  It was a bit of an adjustment at first, but overall I loved them!  


I know what you're thinking... "It's SO much easier to just use a disposable".  Well, it is easier, but cloth diapers aren't as difficult as you may think.


We originally bought two kinds.  The first kind is the BumGenius Organic All-in-One One size diaper, shown below.


I actually thought this kind would be our favorite.  It has snaps, which made it seem like it would last longer.  It also requires no extra effort.  You open the diaper, put it on, or take it off.  Sadly, I was disappointed in this style.  The snaps are a little difficult, and two of them broke.  :(  (BumGenius DOES have a one year warranty on their diapers, which you can read more about here.)  I was also annoyed with these because M kept leaking in them, and would get a diaper rash.  However, this may have been partially our fault.  We didn't have our hot water hooked up at the time, so we may not have washed them properly.  In the end, we sold them because they weren't working as well as we hoped.  I'm sure there are others who like this style, but we just decided to stick with the other style we bought.

The kind that I'm loving now is the BumGenius 3.0 One size pocket diaper (now they have 4.0).  It comes with 2 inserts (one small and one big) that you put inside a pocket of the diaper, which absorbs the moisture.  I don't have a picture of M wearing this kind, but here is a picture of them.  (They have lots of cute colors!)
Source
Here's a video that explains how it works, just because it's difficult to explain without showing you in person.  ;)


Obviously these have velcro, which is a little easier because it's more like a disposable.  I was worried about velcro wearing out faster, and it probably will eventually, but I read here that you can get replacement kits for free.  This website is very helpful, and I'm saving it in my favorites for the day I have to replace the velcro!


It absorbs VERY well, and the layer between the insert and M's skin is always dry!  It really pulls the moisture away from her skin, which is SO much better.  So this is my favorite now!  It's a little extra work putting the inserts in, but it's not hard at all.  So here is the process, to give you an idea.


What about poopy diapers you ask?  Well, yes, those are a bit nasty, but still not too bad.  ;)  We bought a diaper sprayer off of ebay for a cheap price.  They have them for like $40 on some sites, but look on ebay--they're MUCH cheaper.


So when we have a poopy diaper, I just take it to the toilet, turn on the sprayer and spray off as much poop as I can into the toilet.  It can be messy if you aren't careful, but I just stick it far down in the toilet to avoid it spraying outside of it.  (If you don't already clean your toilet regularly, now is the time to start!)  Then I pull out the insert and throw it, along with the diaper into the diaper pail liner (wet bag).  (We didn't buy it from this site, but it's the same thing)  


Source

We keep the wet bag inside a really good trash can to keep M's room from getting stinky.  (We're actually jealous of her trash can--she gets all the good stuff)  ;)  I really don't notice her room being stinky at all until I open the trash can.


Once I'm ready to wash her diapers, I take the wet bag out of the trash can, spray some Lysol in the can, and take the bag to the washing machine.

Source
For dirty diapers while we're out, we have a couple of small wet bags.  They have cuter ones than these, but these were cheap.  ;)


We have 23 diapers I think, so I have to wash them every third day.  It's best to use special detergents on them.  We bought Country Save detergent originally, and it worked well for a while.  


I looked online for tips on how to deal with leaky (and stinky) cloth diapers, and found a lot of info that said the diapers most likely had detergent buildup, so I needed to strip them.  I tried using a teaspoon or so of Dawn and washed them several times.  Didn't work.  I bought some Calgon water softener.  Might have helped a little?  Not good enough, though.  By this time, we were using disposables constantly while looking for a solution.  Finally, I found it.  :)


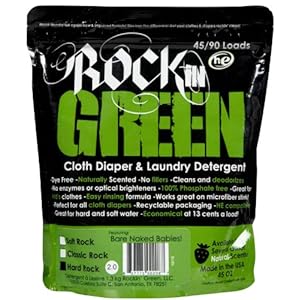
Rockin Green Cloth Diaper Detergent


Rockin' Green's website talks about how "Hard Rock Detergent" was formulated for use with hard water (they have other formulas for softer water), and when I read reviews, it sounded like the customers had the same problems I was having.  So, I decided to give it a shot.  Worse case scenario?  It doesn't work on our diapers, so I just use it for clothes.  


I should probably mention that we have a front loading HE washer, and I don't think those wash diapers as well.  To really get the build-up out, you need to soak the diapers.  (If I got desperate, I could probably stick them all in the bathtub or something like that.)  So, once we received the detergent, we headed to my in-laws home, and washed them there.  


The result?


I let them soak with the detergent overnight, and they've been SO much better ever since!!  I haven't had any leaking problems!  Yay!!  :)  The diapers are much softer and I can keep them on her longer without them getting very full.  I've washed them in our own washer a couple of times since then, and things are still going really well!


I will admit that when I was using disposables all the time, I started hoping that the diapers wouldn't work again, because I figured even if we could get them clean, they would still leak easily.  Nope!!  I'm loving them again, now!  She hasn't leaked at all, except for a time or two at night, when they just got too full.  It might work if we double stuffed the diapers, but we decided to stick her in a disposable with some diaper cream, just to make sure her bottom stays healthy.  She still does get a little rash sometimes.  I'm not sure if that's related or not, but it helps to have diaper cream on it overnight.  :)


If you're interested, we bought this detergent off of Amazon here.  You know what makes this an even sweeter deal??  You can sign up for Amazon Mom for free, and get FREE Amazon Prime shipping!  You can go check out the details at the link.  :)


So, I put all the diapers, diaper liners, wipes and the wet bag in the washing machine.  I pre-wash without detergent in cold water.  Then I do a long cycle with detergent in hot water.  Then, I double rinse!  Occasionally, I will soak them to make sure I don't get build-up again.  I'll probably take them to my parents' house to soak again next time I head that way.  ;)


Last summer I hung the diapers outside every time, but I find that's more difficult to do with an active toddler!  Most of the time I throw them in the dryer, but I'm sure it would help with bleaching and sanitizing the diapers if I put them out in the sun.  I know it helped get them whiter last year!

We're using cloth wipes as well.  We bought a few of them online, but we've discovered that baby washcloths work just as well.  We just throw them in with the diapers so it isn't a big deal at all.  We got a cheap water bottle, and just put some water in there.  You just get your wipe, spray some water on, and there ya go!  (I was using a homemade recipe for wipe solution with water, baby oil and soap, but I decided to just use water now)  :)

So, all that to say, we're loving them!  I highly recommend them if you're wanting to save money over time.  (Just be prepared for the painful experience of purchasing them--remember that it'll save money in the long run!)  :)


If you have any questions, I'd be happy to (try) and help!!  :)  Just leave a comment or contact us.  :)


Have a fabulous weekend!!


Friday, May 20, 2011

Future 'Big Girl' Room

To answer your first question--no, this is not a fun way of telling you that I'm expecting again.  I'm just planning ahead, because it's fun to think about!  :)

M has a Winnie-the-Pooh nursery, and I love it, because it's perfect for a girl OR boy, except for her pink curtains, of course.  I HAD to add as much pink as I could get away with in there.  ;)  I would have loved to go all out and do a girly nursery full of pink and purple butterflies, but I restrained myself and tried to be practical.  (Now watch us have all girls..)  ;)

My time is coming though... eventually Little Miss will need to move to her new big girl room, and I would be lying if I said I wasn't super excited about going all out with girly decor in her room!  These plans won't be carried out anytime soon, but I just want to share my ideas and plans with y'all.  Of course, what makes this slightly MORE interesting is that I'm trying to plan on a budget, because we can't exactly buy her brand new everything for her room.  So, we'll either be making most of these things or getting them online really cheap!  Craigslist will probably be our best friend when it comes to her furniture.  ;)

So, here are my thoughts... pink, pink and more pink.  Elegant pink though, not hot pink.  (I don't think my husband could handle that..)  Here is what I'm thinking about for her bedding.  I probably won't go with this bedding exactly, because it may not even be in stock by the time we get this going, but you'll get an idea of the style I'm looking for.  I actually have a different set in mind, but I'm keeping that one a secret, in case I decide to go ahead and get that one later on.  ;)

From Walmart

I have no plans for furniture, because I highly doubt that I will have the luxury of being picky about that, but I THINK I would like white or beige furniture, if I had my pick.  My big sis and I had that color furniture in our bedroom when we were little, and it's just so very girly.  :)  I DO know that I would like some super cute knobs to go on her dresser, like these below.  I probably won't get these unless I can find some really cheap ones, but they're just so cute!!  Plus, if you know me, I HAVE to have some butterflies in her room.  :)

Girls' Knob Collection
You can find these knobs at Pottery Barn Kids
On the same note, I also love these hanging hooks!!

Butterfly Hooks & Flower Hooks
These can also be found at Pottery Barn Kids
I already have her curtains depending on what color her bedding is and if it will match.  I'm ALMOST done with her curtains!  Just have to finish the tie-backs and then I'll blog about that.  :)  (In case you don't know, these are her curtains BEFORE I gave them a makeover to fit her new windows)


I'm loving the whole organize-your-room-with-cute-baskets trend, like below.

You can find these baskets at babycribstore.com
For books, we have a bookshelf that we could move into her new room, or we could do something like this, which looks pretty easy and SUPER cute.  :)  It's made of fabric!!  How fun!!  


You can get a tutorial at the Penny Carnival blog
For a lamp or two, I want to get a couple of old ones and redecorate the shades with ruffles, like the one shown below.  Of course, I would use fabric to match her bedding.

Tutorial at Homemaker in Heels (Can you tell I'm obsessed with blogs??)
Just for the fun and cuteness of it, I might like to make a flower wreath like the one below.

From Blissful Meandering Blog
Also on her blog, I just saw this idea, and I totally want to do this!!!  How cute would these be?!

Blissful Meandering
I also am loving the idea of adding some chalkboard paint to the walls somewhere.  Maybe not a whole wall, but at least a small section??  It's just so cool!  Or, would that be a bad idea??  Would she start writing all over the rest of the walls?  Hmm.. I'll have to think more on this one. 

Last, but certainly not least, I have to add MORE butterflies to her room.  I don't know if I would go this route or not, but I also have some hanging butterflies that I can just pin to the wall.  We'll see!

Butterfly Dance Wall Art Stencil
Cutting Edge Stencils
Then, of course, I also have a few other things I would hang up, like her cross-stitch, which I'm SO close to being done with!  (forgive my sentence structure.)  Plus, I'm going to paint a scripture for her like I did earlier for my precious nephew (I need to see him again!).  :)

So, those are my plans.  Can you tell that I've put WAY too much thought into this?  I tend to be a little obsessive when I get excited about something.  Now, the trick will be keeping all these ideas for when we actually make a new room for her down the road.  Remind me of all these things later, kay?  ;)

Have a fabulous weekend!!  :)

Link Party List HERE :)

Friday, May 6, 2011

Homemade Easter Dress

So this post is a few days later than I planned.  I'm sorry, I lied.  It was an accident though.  ;)

Since I have a precious little girl, I try to make the most of all the girly-ness that I can.  After all, she may end up being a tom-boy for all I know!  I want to enjoy dressing her up while she can't fight me about it.  Then again, evidently when I was little I liked to wear 'twirly' pink dresses with shiny red shoes, and make mud pies in the backyard.  So, maybe she'll have the best of both worlds too?  ;)

Anyway.

I decided to try and make her an Easter dress this year.  Making clothes scares me a little bit, because they have to actually FIT the person that will wear them.  If I make something like curtains, it's okay if they aren't perfect.  Well, her dress is FAR from perfect, but it's also adorable on her!  Allow me to show you...


I would show you a close-up, but then you could see all the imperfections.  ;)  It's MUCH cuter on my baby girl too, but again, for her safety, I'm not going to show you a picture of her.  (As if I was able to get a good picture of her wearing it on Sunday anyway...)  ;)

I used THIS pattern from Walmart, where is it much cheaper, by the way.  ;)  I made a couple of changes to it by adding a sash so it would fit her, as well as a little iron-on butterfly.  It was pretty easy once my sewing machine started working.  ;)  Maybe this has inspired me to make more clothes for her??  Perhaps.

On a side note, my hubby and I have been trying to redecorate M's nursery.  By we, I actually mean me.  My husband painted her room for me though.  He's a WONDERFUL husband and dad.  :)  Anyway, I think I'll post pictures of the process so you can rejoice with me as we make improvements.  I would say that I'll do that later today, but I don't want to lie again, so we'll just see what happens.  Fresh (and non-ugly) paint?  Check.  New curtains?  Check.  Clean, organized closet?  ..........

Have a happy Friday!  :)


Wednesday, April 20, 2011

Homemade Baby Food: Spaghetti

Whenever my daughter was old enough to begin eating solids, I decided I wanted to make her food myself.  It's not that I'm anti-jar food, but I wanted to save money and liked the idea of knowing what is in her food.

Before I go any further, let me say one thing.  Sometimes when I'm reading other blogs I wonder how people can be SO organized and get SO much done while being a mom.  Well, let me assure you that my house is NOT always clean (it's rarely ALL clean at the same time--I do certain chores each day of the week) and I only have ONE child right now, plus I'm home most of the time.  I make time to do things like this, even though the house needs more attention.  So, PLEASE don't think that taking time to make her food means I have it all together... if you could only see the items scattered all over the floor at this very moment.  ;)  (Extra note:  I got VERY little done today because M wasn't feeling very well, so seriously... making this was one of the FEW things I accomplished today!)

Anyway, I made a trip to the store yesterday and purchased the items below.  This includes chicken tenderloins, four sweet potatoes, two avocados, six kiwis, grapes, nine-ish (?) bananas, and tomato paste.  I realize the tomato paste seems a little out of place here, but I decided to go that route instead of fresh tomatoes this time... maybe next time we'll have some fresh ones from our garden.  ;)


When I first started out making my daughter's baby food, it seemed intimidating, like it would be a lot of work, but it really isn't!  Yes, it is more difficult than opening a jar, but by taking some time, you can prepare a lot of food to last a while.  So, I thought I would do a 'series' of sorts on how I make baby food.  I'm NOT an expert, and I'm NOT saying that my way is the best way.  This is just how I'm choosing to do things.  I get some of my info off of THIS site.  So, if you want to journey along with me, pull up a chair.  Today we're making spaghetti with chicken.  :)  I realize it would probably taste better with beef, but chicken was cheaper yesterday, so there ya go.

My daughter's pediatrician said a basic jar sauce would be fine since she's almost a year old, but I decided to try and make my own, with a little help from tomato paste to get me started.  ;)  

Here are the ingredients I used:
  • 1 can tomato paste (6 oz)
  • 1 1/2 cups water
  • 1 tsp dried basil
  • 1/4ish tsp garlic powder
First I combined the tomato paste with the water.  I added the water slowly, which made it a little easier to mix with the paste.


I put the burner on a low to medium low heat and kept stirring until it combined smoothly.


Then I added the basil and garlic powder.

I want to know why blogger hates me and makes some of my pictures turn like this.  Anybody know why??
Once the seasonings were incorporated (I feel like I'm on a cooking show), I turned up the heat just a little to make sure everything was heated through.  Again, I don't know if this was actually necessary since I wasn't going to serve it to my daughter hot, but I chose to do it this way.

During this time I was cooking my spaghetti noodles, but I imagine we don't need a lot of explanation for that step.  I didn't measure out a certain amount of noodles, so just cook however many you desire.  I actually ended up making two batches because I had enough sauce.  (I'm TERRIBLE at guessing how much pasta to make.  I always seem to make too much or too little!) Once they were cooked, I drained and rinsed them off to let them cool before placing them in my food processor.

Yes, I'm a Fightin' Texas Aggie.  WHOOP! :)
Now, obviously, I pureed the noodles.  I pureed until I couldn't puree any more.  Sadly, I forgot to take an 'after' shot, but just use your imagination.  Then, I poured in half of my sauce.  It's tasted pretty good that way, and my daughter seemed to like it, so that's what I decided to do!  :)


Yum?  Okay, I know it doesn't look great, but remember, this is baby food.  It actually tasted pretty good though!  

I decided to add some chicken for some protein, so I just baked a few pieces of chicken tenders at 400 degrees for about 30 minutes.  I didn't use all of the chicken below for the spaghetti.  Some of it is to add to other things.


They were actually a little overcooked, but as I mentioned in an earlier post, I'm really paranoid about chicken being done, especially if my baby girl is going to eat it!  ;)  Anyway, after it was done, I cut each piece in half and threw it in the food processor.  I wanted TINY pieces, as you can see.  ;)


Afterwards, I simply mixed some of the chicken with the spaghetti.  It got a little thicker once I added the chicken, but I decided to just wait and add a little water to individual servings as needed later on.


Once the chicken and spaghetti were combined, it was time to freeze!  This can be done in different ways.  Sometimes I use ice cube trays, but since I'm a little lazy about cleaning the trays, I've been using a different method.  I just take a cookie sheet, put some wax paper on top of it, then put on some clumps of food.  After I'm done, I cover it with some cling wrap and put it in the freezer for a couple of hours or more.  


Once each 'clump' (for lack of a better word) is completely frozen, I remove them and place them in a labeled freezer bag.  You want to make sure they aren't soft when you place them in the bag, otherwise they'll get stuck together when you place them in the freezer again.  (Can you tell I've learned that the hard way?)  ;)


Now I have several meals for baby girl!  (I have more than is shown above)  :)  This cost less than $3 to make, by the math I just did in my head!  Just take it out the day before and let it thaw in the fridge.  I'm bad about taking it out early, but I'm guessing that's the best way to thaw it!  ;)

Next up: Sweet Potatoes!  (which is MUCH less complicated) :)