My little boy, T, loves loves loves yogurt. Not the kind that has all the sugar and flavorings, although he probably would love it if we gave it to him. But, we just give him plain, tart, high-fat yogurt, and he LOVES it. But, the problem is...it's expensive! When you are trying to be on a grocery budget, like we are, $2.10-$3.00 for a carton of yogurt (and that's the "cheap" store brand) takes a large portion of your budget, especially how fast we got through it! So, we decided to try to make our own yogurt. Actually, my husband decided to. I thought it would be too hard and the savings wouldn't be worth the effort. Boy, was I wrong! It saves a ton of money AND is incredibly easy! There won't be any pictures on this...because they would be boring pictures since every picture would be a crockpot.
Quick breakdown of the savings:
One 32-oz carton of yogurt (cheap brand) is $2.10-$3.00 (and remember, the other brands will be even more expensive)
Four cartons of homemade yogurt = cost of one gallon of milk (depending on what kind of milk you get -- for us, the $3.15 gallon at this time)
There are a lot of blogs out there that say use "full-fat" milk only to make the yogurt, but we have even used skim and it works great.
The first time you make this, you will need one cup of regular yogurt as a starter. After you have already made some, you can always reserve a cup for making more.
Ingredients:
1 gallon milk (or 1/2 gallon)
1 cup yogurt, homemade or store-bought (or 1/2 cup)
Pour the milk in the crockpot. Cover and cook on low for 2 1/2 - 3 hours.
Without opening the lid (there will be no reason to look inside -- it just looks like hot milk), turn off crockpot and leave sitting for 3 more hours.
Take off lid, mix in 1 cup of yogurt, put lid back on, cover/wrap in a towel (to be honest, not sure why, but we do it), and leave sitting for 8 hours.
Yogurt is ready! I like mine with a little cinnamon and maple syrup. Delish!
If you like the thicker yogurt, like greek yogurt, place a coffee filter or cheesecloth in a colander, put the yogurt in the colander, and until the whey (clear yellow liquid) drains out.
You can even freeze the yogurt if you made too much. You can also add fruit to the yogurt to make flavored yogurt.
I think this yogurt tastes better than store-bought yogurt...and so little effort! Enjoy!

Showing posts with label Shawna. Show all posts
Showing posts with label Shawna. Show all posts
Wednesday, August 17, 2011
Sunday, July 31, 2011
Homemade Peanut Butter and Cookies!
My husband and I have been really pondering lately how to save money as well as eat more healthy, especially having one child already and another child on the way. We've been really interested in learning how to make foods, even staples, from scratch. Not only does it usually save money, but it also makes us feel better as parents knowing that the foods we make have no preservatives in them. One thing we've learned to make recently is homemade peanut butter. Now, peanuts can be expensive, but we were able to find them on sale for $1.00 a pound, and the normal price were we can get bulk isn't much more than that. One pound of peanuts will make a normal jar of peanut butter. So, $1.00 for a jar of peanut butter -- and preservative-free -- that's a deal in my book! And making it is super easy. Really. Honestly. Super easy!
Buy a pound of shelled peanuts -- either roasted or not. We've made the peanut butter both ways -- with roasted and unroasted peanuts, and in our opinion, roasted peanuts make MUCH better peanut butter, and you don't have to add any oil this way. My husband had already roasted them when I came home one day, so I don't have any pictures of that. Simply, lay the raw shelled peanuts in a single layer on a cookie sheet and bake 15-20 minutes at 350 degrees. Stir once or twice during cooking. You want them to be brown, but not burnt.

This is my son watching the peanuts in the mixer and signing "eat"! He couldn't wait to try it out!

Before it all starts clumping up together, add whatever you want. I added a little salt and honey, but you can also add some syrup or cinnamon if you want. As you can tell from the picture, the peanut butter will start to clump up but keep it going!

My child thought this was all fascinating!

As it continues to mix, it will start to break down the clump of peanuts and make this lovely paste. The more you mix, the creamier it will be.

The final product! Filled the whole jar! My son LOVED it! Kept signing "eat" and "more" :) Just remember to keep it in the fridge. See how easy it was! And peanuts was the only ingredient...other than your add-ins, of course.

Now, I want to share with you my favorite peanut butter cookie recipe. I hate making cookies because they never come out right, unless they are from a mix. The butter is so hard for me to cook with -- never can "soften" the butter just right. But this recipe is incredibly easy and you can use your homemade peanut butter in it! You only need four ingredients: 1/2 cup of peanut butter, 1/2 cup of sugar, 1 egg, and whatever add-ins you want (I used cranberries in this batch, but you can use raisins or chocolate chips, or nothing!).

Just combine and mix!

In preheated oven at 350 degrees, just drop the cookies on an ungreased cookie sheet and cook for about 11-14 minutes, depending on their size. You can make about 12 small cookies or 9 larger cookies. I made these cookies a little too big, but they were still wonderful!


I asked my husband what he thought about them, and he loved them. He couldn't believe their wasn't any flour, butter, eggs, etc in these because they taste just like regular peanut butter cookies!
Hope you enjoy!

Sunday, March 20, 2011
I Heart Crocheting!
Some people think I'm growing old too quickly because I've picked up this new hobby of mine -- crocheting. You can think what you want, but I'm loving it so far! I've been trying to find a hobby for me being a stay-at-home mom that doesn't take a lot of money but still can be practical and useful, and I came across crocheting after my cousin's wife showed me a baby beanie hat that she had made for her niece for Christmas. ADORABLE! It even had these cute little bows you could switch out for different outfits. So, I set out to learn how to crochet! I will say, I was really (a little too much probably) optimistic in the beginning that I would just pick up this art like a pro but found it to be really frustrating instead. But, I continued working at it and I'm slowly improving. I've made a scarf, a baby blanket (which isn't perfect at all, but for my first attempt, I'm pleased with myself), and this new little creation:

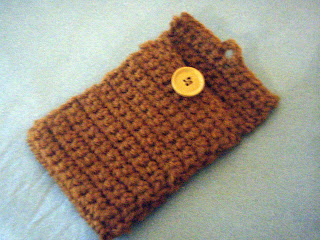
 It is supposed to be a cell phone holder, but it can probably be a whatever-kind-of holder you want it to be. If you make it longer, it can be a holder for your glasses. And it was really easy! If anyone is a crocheter out there, all you do is make a "scarf-like" piece about 10 inches or so long, then fold it over and sew up the sides (of course, you have to make the button hole as well). The hard part for me was the sewing up the sides, which is probably not professional looking at all, so I'll have to work on perfecting that. But for my first project other than just a blanket/scarf, I'm happy with it! I love this hobby because it gets me away from the computer, technology, and just doing something that has been done for centuries. Now, to my next project...
~ Shawna


~ Shawna
Thursday, March 17, 2011
Seeing Our Heavenly Father Work
Being the person our Heavenly Father wants us to be can be so trying sometimes. The big stuff (drinking, drugs, affairs, etc) have never been really tempting to me, but just because we don't engage in the "big stuff" doesn't mean we're being the person God wants us to be. I've struggled with being focused on a daily Bible study, and I could use the excuse of having a young child, but I think it is more of my own discipline and drive. Sometimes I wonder if God really has a plan for our lives and if being really disciplined in my study/prayer life will really make a difference. I've needed something from God lately to just know that I'm on His mind and that He truly does care about me and the little things in life. Well, today I've seen Him work in the little things in my life:
Our Father truly does care about our finances. I'm not saying that He will always give us more than we need, but He will give us what we need if we are focused on doing right with our money and being right with Him. Recently becoming a stay-at-home mom and not a working mom has caused our finances to be a lot tighter. However, so far, we've continued to be able to save a little every month, which is great because we hope to buy a house in a little over a year. However, while sitting and eating dinner last night, my husband and I were talking about some changes we're going to have to make within our budget and it may cause us to not be able to save that amount that we've been able to save thus far. It was hard for me to accept but I knew the reasoning behind it was well worth it. However, the very next day, I go for a job interview and got a part-time job as a teacher at a Mother's Day Out program, in which my child will even be in my classroom. The amount that I will bring in doing this will be about the amount that we were saving before on a monthly basis. I won't have this job during the summer but I know God will provide somehow if it is in His will for us to save that money. God's promise to provide is true. He will provide for His children.
Friday, March 11, 2011
Onions, Onions, and More Onions!
Probably one thing you have learned so far with this blog is that Jennifer is the creative one out of the two of us (although I am working on a crocheting project!). However, I do LOVE looking at crafty blogs, so maybe I'll become more creative as time goes on. This blog, as you can probably tell by the title is about onions! And honestly, right now, my eyes are still recovering from my battle with the onions. This might also be an opinion review over a new kitchen gadget I have. I'll explain about it below.
So, a few months ago, onions were pretty expensive...like almost $2.00 a pound! Today, I found them for 8 pounds for $1 -- oh, how it put a smile on my face! We cook with onions a lot around here. But don't worry -- we're good about brushing our teeth! I could have gone crazy with the onions and bought lots more than what I did, but I refrained. I ended up buying about three pounds for about $0.40.

This is the new kitchen gadget I have. I actually came across it at my mother's house. She got it at a garage sale who knows when and had forgotten she had it, so she just gave it to me.

A little side note:
I used to HATE peeling onions (and even now, they're not on my top 10 favorite things to do in the kitchen), but I've learned a better way to peel onions. It is pretty much a "duh" thing, but just in case you need a "duh" moment and you hate peeling onions too, I'll help you out. First, cut off one (or you can do both) ends of the onion.

See...I put pictures up to help ;) Next, cut it in half lengthwise.

Then, just peel the outer skin off! Much easier this way. Saves me a lot of frustration...even though I should have thought of this way earlier. So, if you are like me and sometimes don't think of the obvious, hope that helps!
So, I put the onion halves in the chopper and chopped away and came out with this amount in which will be stored in our freezer:

I actually thought I would have more from six onions, so I may have to go buy some more tomorrow. Now, when I need chopped onions to throw in a recipe, they will be ready to go!
My review on the product: I definitely wouldn't have paid more than a few bucks on it. You have to used some strength to push the handle part down to completely chop the onion. My electric chopped probably can do it just as good for less energy on my part. However, it does say that that it can do potato fries, so I may try it out. It also has another attachment that cuts up the veggies finer. So...that's my opinion. If you can get it for just a few bucks (or free like I got it) and you have room for yet another kitchen gadget, then go for it.
One more thing -- I got the onions from a Hispanic market. We have one really close to our apartment. I never thought about doing any of my shopping there, but we get their flyer in the mail and they have really good deals, especially on vegetables. They often have specials for avocados for 8-10 for $1, and of course, specials on onions. It's also where I get my 30 count eggs for $1.88. So, anyways, if you have a Hispanic market close by, it may not hurt to check it out!
Tuesday, March 1, 2011
Raisin Bran Muffins -- A Favorite of Mine!
So, one thing about me -- I LOVE MUFFINS! But strangely enough, I'm not in love with those fluffy, light-as-air muffins, such as the famous blueberry muffins or poppyseed muffins. Don't get me wrong -- they ARE very good. But, I like lots of texture when it comes to muffins. I like the taste of fiber and grains. And when I make these muffins, I snack on them ALL DAY LONG.
Seriously I do.
I have one with my morning oatmeal.
Then I usually have one as a morning snack.
Then I often have one as an afternoon snack.
And ashamed to say (or should I really be ashamed? I mean, they are muffins full of grain and fiber! It's not like I'm eating ice cream all day long...but wouldn't that be fun? ;), I usually have one (or two) before bed.
At this point in my life, I'm in love with muffins. Maybe I should say that most of the muffins I make are mini-sized, so please don't think I'm gorging myself on these huge (albeit delicious) muffins :)
Anyways, I should have taken pictures of the process (I mean, that makes a blog better, right? Lots of pictures?). I'll remember next time. But I will take pictures after they are finished!
I modified (just a little) this recipe from http://www.browneyedbaker.com/2010/04/27/raisin-bran-muffins/.
It makes 12 normal-sized or 24 mini-muffins.
1½ cups all-purpose flour (I like to used half white and half rye flour -- but I bet wheat flour would be good too)
½ teaspoon baking soda
¼ teaspoon salt
1/3 cup granulated sugar
3 tablespoons light brown sugar
2½ cups Raisin Bran cereal
1/3 cup vegetable oil (you can substitute applesauce in place of the oil to make the muffins healthier)
1 egg
1¼ cups buttermilk (if you don't have buttermilk, you can add 1 1/4 T vinegar to make 1 1/4 cup milk and let set for 5-10 minutes)
½ teaspoon vanilla extract
1/2 cup chopped pecans (optional)
1. Preheat oven to 375 degrees F. Line a muffin tin with liners, or spray with non-stick cooking spray.
2. In a large bowl, whisk together the flour, baking soda, salt and sugars. Stir in the cereal; set aside.
3. In a medium bowl, whisk together the vegetable oil, egg, buttermilk and vanilla extract.
4. Pour the wet ingredients over the dry ingredients, and stir until completely combined. Add the pecans. Allow the mixture to sit at room temperature for at least 45 minutes (this allows the cereal to soften in the batter). If you don’t want to use immediately, you can refrigerate in an airtight container for up to three days.
5. When ready to bake, divide the batter between the 12 muffin tins. Sprinkle the tops with granulated sugar.
6. Bake for 15 to 20 minutes (mini muffins will take shorter), or until a thin knife inserted in the center comes out clean. Store in an airtight container at room temperature for up to two days, and then in refrigerator for up to another week.
Before:
 After:

Hope you enjoy!!! ~Shawna
Seriously I do.
I have one with my morning oatmeal.
Then I usually have one as a morning snack.
Then I often have one as an afternoon snack.
And ashamed to say (or should I really be ashamed? I mean, they are muffins full of grain and fiber! It's not like I'm eating ice cream all day long...but wouldn't that be fun? ;), I usually have one (or two) before bed.
At this point in my life, I'm in love with muffins. Maybe I should say that most of the muffins I make are mini-sized, so please don't think I'm gorging myself on these huge (albeit delicious) muffins :)
Anyways, I should have taken pictures of the process (I mean, that makes a blog better, right? Lots of pictures?). I'll remember next time. But I will take pictures after they are finished!
I modified (just a little) this recipe from http://www.browneyedbaker.com/2010/04/27/raisin-bran-muffins/.
It makes 12 normal-sized or 24 mini-muffins.
1½ cups all-purpose flour (I like to used half white and half rye flour -- but I bet wheat flour would be good too)
½ teaspoon baking soda
¼ teaspoon salt
1/3 cup granulated sugar
3 tablespoons light brown sugar
2½ cups Raisin Bran cereal
1/3 cup vegetable oil (you can substitute applesauce in place of the oil to make the muffins healthier)
1 egg
1¼ cups buttermilk (if you don't have buttermilk, you can add 1 1/4 T vinegar to make 1 1/4 cup milk and let set for 5-10 minutes)
½ teaspoon vanilla extract
1/2 cup chopped pecans (optional)
1. Preheat oven to 375 degrees F. Line a muffin tin with liners, or spray with non-stick cooking spray.
2. In a large bowl, whisk together the flour, baking soda, salt and sugars. Stir in the cereal; set aside.
3. In a medium bowl, whisk together the vegetable oil, egg, buttermilk and vanilla extract.
4. Pour the wet ingredients over the dry ingredients, and stir until completely combined. Add the pecans. Allow the mixture to sit at room temperature for at least 45 minutes (this allows the cereal to soften in the batter). If you don’t want to use immediately, you can refrigerate in an airtight container for up to three days.
5. When ready to bake, divide the batter between the 12 muffin tins. Sprinkle the tops with granulated sugar.
6. Bake for 15 to 20 minutes (mini muffins will take shorter), or until a thin knife inserted in the center comes out clean. Store in an airtight container at room temperature for up to two days, and then in refrigerator for up to another week.
Before:


Hope you enjoy!!! ~Shawna
Monday, February 28, 2011
Stocking Up on Fresh Veggies!
Our family eats a lot of vegetables. A lot. I guess living overseas with an abundance of fresh (and CHEAP) vegetables taught us to love vegetables. Living in a big city gives us several places that often has vegetables on sale. For example, normally a pound of broccoli is about $2.50, but for two weeks, it was on sale for $0.67 a pound, so guess what? I bought lots! But of course, I can't use all that broccoli before it goes bad. Luckily, in the small storage room outside of our apartment, we have a small freezer. So, right now, it is in the beginning stages of stocking up. It currently contains deer, clearance bread (which Big Lots has great clearance bread...at least the one near us does!), and frozen veggies. Our inside freezer has more bread, more deer, and frozen potatoes.

This post will explain how to take those clearance veggies and freeze so you can have them on hand for later.
First, I want to explain how to freeze your colorful veggies, such as green beans, squash, your colored peppers, broccoli, etc... You pretty much do the same for them all.
1) Wash and cut them up how you would like to have them later -- chunks, strips, cubes, etc.
Sidenote, make sure you have plenty of ice cold water or lots of ice cubes. Important for later.
2) Throw them in boiling water and let them boil for about 3 minutes. You want them partially cooked. You can use the same boiling water several times before changing it.
3) Place the veggies in the ice cold water for about 3 minutes. This will stop the cooking. Drain.
4) Put enough in each freezer ziplock bag for one meal and get as much air out as possible. A vacuum sealer is best, but I don't have one...as of yet, but it may be a good investment.
Use the veggies the same as any frozen store-bought veggies. One thing I have learned -- if you want to steam the broccoli in a pot, don't add any water to the bottom. Just place the veggies in the pot and turn the pot on. The water from the ice will give it enough water to steam.
Now, the same also goes with potatoes. One store close by had a 5 lb bag for $0.88, so I nabbed it. Now, they were the older potatoes I think but that is actually great if you want to freeze them. I read that the best potatoes to freeze are the ones that have matured for at least 30 days...so you don't want the freshest out there.
When you cut the potatoes, you can skin them or leave the skin on -- it's up to you. You can also make french fries, potato rounds, cubes, and hashbrowns (which I haven't made yet). After boiling and icing them, you need to lay them single-layer on a cookie sheet to freeze. Once frozen, you can place them in individual bags. Treat them as any frozen potatoes (i.e. frozen french fries) you would buy in the store. You don't need to vacuum seal potatoes.

Not the best picture, but it shows the different ways to use potatoes. My husband used the cubes the other day as a side dish and it was delicious! He tossed them in some Italian salad dressing, cooked them at 400 until they became soft, then broiled them until they looked ready. Delicious! And may I say cheap cheap CHEAP!
Freezing veggies does take time, but if you stock up when those veggies are on sale and freeze them, it can save you lots of money! This is also great if you have a garden or know someone that will give you lots from their gardens!
Shawna
Saturday, February 26, 2011
Memorizing Scripture
I think that two things that most Christians struggle with the most are praying and scripture memorization. Prayer should be a simple act, and I feel that simplicity is God's plan for prayer, but there are so many books, thoughts, methods on prayer that it becomes confusing on "how to" pray. Should I "talk" to God as my best friend or should I show reverence to him during my prayer and speak to him as the creator of the universe? Should I set aside a time everyday to pray or is setting a time putting limits on our prayer life? Should I pray for everyone on my prayer list everyday (which can be exhausting!) or should I have a revolving prayer list? Should I pray for specific things or only that "His Will is done"? See what I mean? Prayer can be confusing and difficult at times, and I definitely don't have the answers. It is definitely something I struggle with myself, although I do feel that God honors any true attempt at prayer.
Anyways, this blog isn't about prayer but about scripture memorization. Some Christians have a gift for memorization and absolutely LOVE spending time memorizing scriptures, and how I wish I were that person! However, I feel that most Christians would be embarrassed if they were honest about how many scriptures they knew by heart, and I would definitely be one of them. I read this quote recently and thought it was very inspiring:
“I know of no other single practice in the Christian life more rewarding, practically speaking, than memorizing Scripture. . . . No other single exercise pays greater spiritual dividends! Your prayer life will be strengthened. Your witnessing will be sharper and much more effective. Your attitudes and outlook will begin to change. Your mind will become alert and observant. Your confidence and assurance will be enhanced. Your faith will be solidified” (Growing Strong in the Seasons of Life [Grand Rapids: Zondervan, 1994], p. 61). Chuck Swindoll
So, if all this is true, what is keeping us from memorizing more? I want my prayer life to be strengthened (maybe memorization will help us in that other struggle -- prayer)! I want my witnessing to be sharper and more effective! I want all of that! So, why do I not focus more on that?! Because it is hard...it is often tedious...it can be boring...I find "better" things to do...I'm fine without it... These are all my excuses. However, growing in my walk with the Father, becoming the person that God wants me to be, God never promised that it would be fun, exciting, easy. So, I've decided for the New Year that I wanted to focus more on scripture memorization. A friend of mine put a link on her blog, something that she wanted to do also:
http://www.aholyexperience.com/a-bible-memorization-booklet-colossians-in-a-year-printable/
Sidenote: This is a beautiful website. I often listen to the music during the day while taking care of my son. Very calming and relaxing.
I was very intrigued by this challenge. However, I am one that finds a "great" idea and starts it only to quit it soon after due to boredom, frustrations, or some other reason. But this one, I want to keep because my life and walk needs it. I need it. I need a challenge that will me grow, to help me understand more of who my Father and Savior is. (By the way, I had to ask my husband if I should put "is" or "are" and he couldn't answer -- he said I may have found the one exception to the rule!).
I challenge all of you, if you struggle with scripture memorization or just want to memorize more, to find or develop a scripture memorization plan, whether it is the Colossians plan demostrated through the website shown above or another plan of your choosing. I doubt you will ever regret studying and memorizing God's Word!
Shawna
Shawna
Homemade Tortilla Chips
As many of you know, store tortilla chips can really be expensive! But what you probably didn't realize that for those that have a little extra time to be in the kitchen, your own tortilla chips are REALLY easy and cheap to make. While living overseas in Asia, we were not able to find much American convenient foods, chips being one of them. Well, we did have Lays potato chips, but we weren't all that crazy about the flavors -- shrimp, blueberry, chicken, etc... But no tortilla chips, and we LOVE fajitas (even if we had to make our own tortillas, because...well, you get the idea). An American friend of ours taught us how to make tortilla chips out of jiaozi skins, which are the wrappers for steamed dumplings. They were easy and very good. So, when we came back to America, we realized that we could probably do the same with corn tortillas. As many of you know, corn tortillas are CHEAP and this recipe is very easy and healthy. We never buy tortilla chips anymore. Why spend the money if we can make our own?! Here is a cost comparison:
A regular bag of tortilla chips has about 10 servings at 16 chips each equaling 160 chips (this differs a lot, I know) -- $3.00+
Homemade tortilla chips using a normal bag of 24 corn tortillas which makes 192 chips -- $0.77
Homemade tortilla chips using a bag of 72 corn tortillas on special, making 576 chips -- $1.50
So, if you are interested, here's how to make them:
First, get as many corn tortillas you want, and stacking them, cut them in 8 pieces. My picture below only shows one tortilla.

Next, place them on a baking sheet (no need to spray). Unstack them, of course! You can spray them with butter spray or something similar but it's not really necessary. Now, season with anything you want. In my example, I did salt, pepper, paprika, and oregano.

Last, place them in an over at 400 degrees. Let them cook for about 7-10 minutes, but watch them closely -- they will burn quickly! Here is the end result:

Very crunchy and good, especially with a good hot sauce, cheese dip, or guacamole.
Enjoy! -- Shawna
Thursday, February 24, 2011
Meeting Shawna
My name is Shawna, and to be honest, I'm not the best blogger. I think of ideas and have this grand plan to start blogging, but I never seem to follow through...other than the monthly updates of my one year old little man. I love checking out other blogs from people that are much more organized, creative, well-written, exciting than myself, and there are some that I keep up with so well that I feel that I know the person, like I could call them up and just chat...then I realize that they have no idea that I even exist. I doubt there are any people like that on my personal blogsite. Not creative enough to catch the attention of random people, for what random people would like to know what my x-month old child is learning or eating or saying or doing?
Anyways, one of my dearest friends emailed me the other day asking if I would like to join her in starting a blog about being crafty, thrifty, and loving God. The funny thing is, she has known me her whole life and she doesn't realize that I am NOT crafty. I so wish I was. I've started learning how to crochet, so maybe that is a little crafty. I have a lot to learn in this area. Thrifty is something I AM. Maybe a little too thrifty. Maybe embarrassingly thrifty. I would rather put that extra $20 in savings then go on a date. Luckily, I'm married to a more realistic (also thrifty) husband that likes to have a little fun and talks some sense into me at times. I'm also a newly stay-at-home mom. Not completely by choice, but due to my husband's job training and having to pick up and move for a "short" time, we felt it was the best decision for me to stay home. So, me staying home and living off of one income means that my thrifty side of me is super-charged. Maybe I can be of use in this aspect of the blog. And loving God. Oh, how I want to grow in this area. Some days are really easy to love and trust my Heavenly Father, and other days I struggle with questioning if He really knows what He is doing. My husband and I were foreign missionaries for a time but had to return to the states due to illness, and since then, I've been growing in my relationship with Him, learning how to trust Him when my own plans on serving Him fell through. It definitely hasn't been a continuous mountaintop the past several months -- there have been lots of valleys as well. But your faith and trust in Him can't be challenged and grow while on the mountaintop. So, part of this blog I guess will be some of my journey in my growing in faith and learning how to trust Him more and more.
I'm excited about being part of this blog and hope that those keeping up with it will have some fun with us!
Subscribe to:
Posts (Atom)