Showing posts with label Crafts. Show all posts

Friday, March 14, 2014

Tinkerbell Clothespin Doll

Update:
I have recently opened an Etsy shop - FairyTinkBoutique.

I also have printables on there from my Home Management Notebook.  Right now, I have a code for 50% off every item in the store.  The code is GRANDOPENING.

Is anyone out there??

Clearly, we haven't written on here in forever!  We both have been busy with little ones.  :)

Speaking of little ones, my oldest is three years old, and loves Tinkerbell.  I have never been a Tinkerbell fan, in all honesty.  She had a little too much attitude for me in "Peter Pan".  However, after watching the new Tinkerbell movies, I just think she's adorable.  I seriously don't mind watching them over and over, which is a definite plus when it comes to kids' movies.  ;)

Anyway..

My oldest daughter and I made a fairy house out of an oatmeal box one day, but we didn't have any fairies to go in it.  I looked around the stores, but they were all too big for the fairy house.  So, I decided it would be more fun to just make our own fairies!

Enter clothespin Tink!


This was only the beginning.  I also made Periwinkle, Silvermist, Rosetta, Vidia, Fawn, Terrance, and Iridessa.  We have a kingdom of fairies at our house now.

I decided to open an Etsy shop, and just listed this for sale.  I'm going to see how it goes, and then I may add other fairies as well.  If you're interested, here is the link to my shop:  FairyTinkBoutique

Y'all have a great weekend!!  :)

- Jennifer

Friday, July 29, 2011

Curtains Tutorial

TGIF!!!  :)  (I miss those shows...)


Last Saturday, I guest posted on Not JUST a Housewife, and so here is the posting from there.  :)


Before M was born, I decided to make some girly curtains for the nursery to add some pink to the neutral Winnie-the-Pooh theme we have going on.  I started on them a year and a half ago, finally finished them about month before she was born, got to see them hang in her nursery in their beautiful glory for two months, then we moved to a new house.... where she now has two small windows instead of one big one, so they didn't fit.  This equals a sad Jennifer.  I was determined to fix them though.  Allow me to show you the progression..


We went from this (at the old house)...


To this (at the new house)...


I had to do some brainstorming, and with the help from a sweet lady at our church, we came up with a plan.  I ended up splitting each curtain into two pieces, and then making a valence because the curtains weren't tall enough to cover the window on their own.  I also had to purchase some more coordinating fabric to add a couple of more panels (two for each window), to go in between the pink curtains.  It made the curtains fuller, and made them look better than I ever even imagined!  I love them!


Want to make some cute curtains for your little one (or yourself)??  Let's get started!


I'm working with a window that is 52 x 35, so that is what I'm basing all of my measurements on.  Make sure you adjust according to your window size!  :)


You will need:

  • Four 55x22 inch pieces of fabric (Two in one color, and two in a coordinating fabric)
  • Two 20x5 inch pieces of fabric (for tie-backs)
  • Two 36x5 inch pieces of coordinating fabric (for tie-back ruffles)
  • Two 5x2 inch pieces of fabric (for tie-back ends)
  • Coordinating Thread
  • Sewing Machine
  • Scissors
  • Pins
  • Pencil
  • Measuring Tape
  • Lace to accent ruffles (optional)
  • Keep in mind that if you want ruffles on your curtain panels, you will need extra material.  You will also need extra material for the valence, which I'm not including in this tutorial.
1)  Once you have your material measured and cut, go ahead and hem the sides of the curtains.  I did a double folded hem, because I think it looks nicer.  :)


If you aren't adding a ruffle, then go ahead and hem the bottom.  If you're wanting to add a ruffle, then you can get an idea of how to do that when I show you how to make the tie-backs.


2)  Once all of the sides are hemmed, go to the top and just do a raw edge hem, because it will be hidden later.


Far from perfect, but you can't tell when they're hanging! :)
3)  Now fold it over 3 inches or so and pin it.  Stitch it close to the edge.


4)  Now, you need to stitch another line for the rod to go through.  You don't have to do this step, but it makes it look nicer.  I allowed about an inch and half for the rod, which works, but it's a very tight fit.  So, I would suggest going two inches or so from the original stitching line, depending on the size of the curtain rod you'll be using.


Then you're done with the simple panel!  :)


Now for the tie-backs...(I'm going to refer to each piece that I'm using by color, to avoid confusion)

5)  Take a 20x5 inch piece of pink material, and hem the short sides and the top (raw edge hem).


6)  Take a 36x5 inch piece of beige fabric for the ruffle section, and do a double folded hem on the short sides and bottom of the fabric.


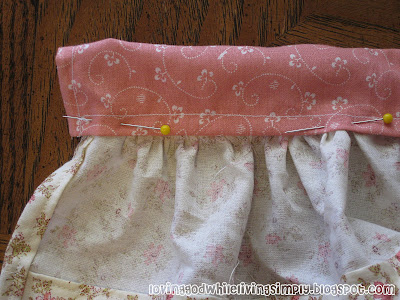
7)  Next, do a long stitch across the top of the beige ruffle fabric, and then gather it to make it a ruffle.  You want to make sure it is gathered to match the length of your pink fabric, above.


8)  Now, lay the two pieces of fabric together, right sides facing each other, and pin the fabric together.


9)  Stitch across the top.  (Note:  If you want to place a ruffle on the actual curtain panel, just leave the bottom un-hemmed, and follow steps 6-9 with the appropriate amount of fabric needed.)


10)  Fold the top of the pink material over the raw edge of the ruffle, and stitch.


You're almost done!  Now you just need to make the end of the tie-backs!


11)  Take a 5x2 inch piece of pink fabric, and fold the edges over, so they meet in the middle.  Then, fold the material in half, and pin.  Stitch.


12)  Take your ends, and fold them in half so they form a hoop.  Place the ends into the opening of the tie-backs, and then stitch.


All done!!  :)


If y'all have any questions, I'll do my best to answer them!  Have a fabulous weekend!!  :)


Wednesday, June 1, 2011

Blessings Canvas


I try to be a positive person, but I definitely have my glass half empty moments.  Sometimes I'm just frustrated because my daughter won't eat her lunch, or just threw her food all over my shirt.  In those moments, I sometimes feel the need to walk into another room and just let out a little yell... but I don't really want to handle my frustrations that way. I know that I'm human, so I will get frustrated at times, but I want to focus on something that is very important.

I am blessed.

Sometimes I get a rude awakening when I see the difficult things that others are experiencing, like the poor victims of all the tornadoes.  I get frustrated when I can't clean the house as well as I'd like, but I have a home.

I feel frustrated when I want to do something (such as finishing this blog), but I can't, because my daughter is demanding my attention.  I have a sweet baby girl.

I may get annoyed with my husband at times, but I have a wonderful, loving husband.

I don't know why I have been blessed in so many ways, because I don't deserve all of this.  It doesn't seem fair that some people have so little when I've been given so much.  All I can say that I am blessed because of God's grace.

Instead of complaining, I want to remember that I am blessed, and I want to focus on my blessings rather than things that make me feel down.

This is why I decided to make a blessings canvas.  I'm going to hang it up where I can see it multiple times a day, and hopefully, when I'm starting to feel frustrated because M has once again pulled all of the tupperware out of the cabinet (although honestly, this doesn't bother me!), I will smile and be reminded of God's grace in my life.

So, here is how I made it.  :)  You also get to see the 'oopsies' I made, as well.  ;)


First, I just drew a border and a rectangle in the center using a ruler.  After I painted it, I lightly drew a couple of pencil lines (with a ruler) to make sure my words were straight.  ;)  I traced the pencil markings with a paint marker, because I'm just not sure that I have the skills to use a paintbrush for the words.  ;)  

I also painted a thin red border around the whole thing, but it didn't look right to me.  So, I decided to paint over the words and try again.  (I actually thought it looked kinda cool with one coat of paint covering the words.  I think that might be fun for a different project, but for this one, I wanted to make sure that you could read all of the 'blessings' God has given us!)

I decided to scatter out the words, move the hearts up a little bit, and paint the entire border red.  


I still didn't think it looked quite right though, so I experimented a little bit.  I thought it might look good if I used a sponge brush to add a little beige paint to the border, to give it a bit of a rustic look.  Only, I don't have a sponge.  So, I had to improvise!  (My hubby and I have learned that using what you have is a survival skill when you live out in the middle of nowhere)  ;)

I ended up grabbing a paper towel, folding it up, painting a light layer of paint onto a small section, and then dabbing it around the edges.  Worked like a charm!  :)


You can check out my other painted canvas here, and here is where I party! :)

Have a happy, blessed day!!  :)


Monday, May 23, 2011

Cross-Stitch Birth Announcement? Check!

After (almost) a year and a half, I have completed M's cross-stitch birth announcement.  I should have finished it long ago.  Memo to me:  Don't save all the less fun parts for the end!


So, here it is in all its glory.  Well, all of its glory minus the actual info about my baby girl.  ;)


And, a couple of close-ups...


The frame was actually kinda ugly and black, but thanks to some 'ballet slipper' (pink) spray paint, it's looking cute and fabulous.  :)

It feels AWESOME to finally check this off my list!  Next, I need to finish the tie-backs for her curtains.  :)

Have a happy Monday!

Monday, May 9, 2011

Home Management Notebook

UPDATE:  I have made a few alterations, and am slowly making these files available to purchase in my Etsy shop.

I have a coupon for 50% Off every item until March 31, 2014.  The code is GRANDOPENING.

I have dropped the prices on everything!  Prices range from $.99-$2.99. 

Click HERE for the Cleaning Checklist.  :)
Click HERE for the Meal Planning and Budgeting Set.
Click HERE for the Medical Contact Sheet.

As I was 'stalking' blogs the other day, I came across the IHeart Organizing blog, and found this super cute idea!!  It's a way to organize tasks and other information in/about your home, and I decided I wanted to make my own notebook.  I've mentioned a few times how much I want to be organized, but I ultimately fail.  It's just not a natural part of my personality, but I'm working on it, only to make my life a little easier, not to mention keeping the house cleaner!  ;)

I decided to make all of my pages on paint.net, which is a free program you can download.  I don't know half of the things I can do on there yet, but I LOVE it!  SO much better than using the old paint program that's on every computer.  ;)

Allow me to show you how super cute (in my own, humble opinion, that is...) our family notebook turned out!  :)


I still have a couple (or more, we'll see!) pages to add, but you'll get the main idea.  ;)  First I have a "Cleaning Checklist" sheet.  It has things for me to complete daily, weekly, monthly and annually.  I laminated it so I can just check things off if I'd like.  I think it will be helpful.  :)

To purchase this cleaning checklist, or have it customized to fit your needs, please check out my Etsy Shop--FairyTinkBoutique.


Then I wrote down a list of meal ideas as well as side dishes.

Why does it turn my pictures?! :(

Across the page I have my "May" meal planning calendar.  Now I can look at my list of meals to get ideas and write them down on my monthly calendar.  I try to plan out every couple of weeks or so, to make sure that I have everything I need for our meals.  Plus, it sure does take the stress out of thinking of what to make for supper!  I'll still use my planning board though--I LOVE that thing!  (I just realized a mistake I made.... I laminated my calendar so I could use dry/erase markers, but it says "May" at the top, so I can't use it every month...ptth)  Well, I guess from now on I'll either just print out a calendar for each month to place in a page protector, or print out a blank one to fill out each month.  I'll probably just go the first route.  ;)


Now that I have planned out my meals, I have a grocery list, along with a list for other items I need to buy.  I'll be honest here and say that I'll probably print out future grocery list pages in black and white, but it's so pretty like this!  ;)


Next I have a list of doctor's numbers as well as insurance information.  Now when I'm on the phone with my doctor and they ask for my insurance info, it's all in one spot.  :)  (After all, it's SUCH a chore to go get my card out of my wallet...*sigh*)  ;)

I'm also working on an emergency contact list, which includes the local hospital, poison control number (?), family phone numbers as well as neighbors' numbers.  I think this would mainly be helpful if somebody was babysitting for us and needed to contact us while we're out.


Here are my 'fun' pages!  I have a list to write down craft ideas as well as things I want/need to organize.  This may seem pointless to some, but there have been several times that I've had an idea and then forgot about it when I had time to do it!  So now, that problem is fixed.  :)


The next page is mainly for my hubby.  We have an old house, so we have a lot to fix up!  Note that I made this page slightly more manly with the darker colors, although the little hearts that dot the 'i's probably take all of the manliness away, oh well.  (Not that I don't love blue too!) ;)


The last page I have finished is my travel list.  EVERY time we go somewhere overnight, I make a list of my things as well as M's things to pack.  I always over-pack, but that's beside the point.  I just want to make sure I take everything we need.  Since a lot of my list is the same each time, I went ahead and typed up a few things.  I also left space to write down the rest of my list whenever we go places.  :)


I'm working on a budget sheet as well, but y'all don't need to see that one.  ;)  I may add more pages when I think of things, who knows?  It was really fun to make, so we'll see how useful it is over time!  I'll be testing out the meal planning/grocery list system tonight.  (I have never enjoyed grocery shopping as much as I do now that I'm a stay-at-home mom, can I get an amen??)

Y'all have a fabulous day!!  :)

Linking up to THESE parties  :)

Friday, May 6, 2011

Homemade Easter Dress

So this post is a few days later than I planned.  I'm sorry, I lied.  It was an accident though.  ;)

Since I have a precious little girl, I try to make the most of all the girly-ness that I can.  After all, she may end up being a tom-boy for all I know!  I want to enjoy dressing her up while she can't fight me about it.  Then again, evidently when I was little I liked to wear 'twirly' pink dresses with shiny red shoes, and make mud pies in the backyard.  So, maybe she'll have the best of both worlds too?  ;)

Anyway.

I decided to try and make her an Easter dress this year.  Making clothes scares me a little bit, because they have to actually FIT the person that will wear them.  If I make something like curtains, it's okay if they aren't perfect.  Well, her dress is FAR from perfect, but it's also adorable on her!  Allow me to show you...


I would show you a close-up, but then you could see all the imperfections.  ;)  It's MUCH cuter on my baby girl too, but again, for her safety, I'm not going to show you a picture of her.  (As if I was able to get a good picture of her wearing it on Sunday anyway...)  ;)

I used THIS pattern from Walmart, where is it much cheaper, by the way.  ;)  I made a couple of changes to it by adding a sash so it would fit her, as well as a little iron-on butterfly.  It was pretty easy once my sewing machine started working.  ;)  Maybe this has inspired me to make more clothes for her??  Perhaps.

On a side note, my hubby and I have been trying to redecorate M's nursery.  By we, I actually mean me.  My husband painted her room for me though.  He's a WONDERFUL husband and dad.  :)  Anyway, I think I'll post pictures of the process so you can rejoice with me as we make improvements.  I would say that I'll do that later today, but I don't want to lie again, so we'll just see what happens.  Fresh (and non-ugly) paint?  Check.  New curtains?  Check.  Clean, organized closet?  ..........

Have a happy Friday!  :)


Wednesday, April 13, 2011

Idea for Mother's Day!

Ok, so it probably seems I've gone AWOL, huh?  Well, I'm here, but between working some, having an extremely active child, and a blank mind, I haven't been able to blog much.  And this isn't much of a blog either but I just wanted to share it with everyone because it would be such a wonderful Mother's Day gift for all your wonderful mothers/mother-in-laws. 

It's a "buy one, get two photo books free" deal from Snapfish.  Here is what you have to do:
  • Head to Snapfish.
  • Choose either an 8″ x 11″ Custom Cover or an 8″ x 11″ Classic Photo Book
  • Make a 20-page book, extra pages are charged regular rates
  • Place all 3 books in your cart for checkout and use code MOMMYBOOKS by Monday, April 18*
(forthemommas.com)


So, hurry hurry by next Monday! 

~ Shawna

Tuesday, April 12, 2011

Hairbows

I would love to have a little boy one day, and when I was pregnant I knew that we were blessed regardless of the gender of our baby.  I have to admit though, when I found out we were having a girl, I was SO excited to dress her in all sorts of girly, frilly things and put TONS of bows on her precious head...one at a time, of course.  ;)

I did NOT want to pay for bows though.  I figured it would be cheaper to make them, and more fun too.  So, my mom helped me make several before she was born, and they were super cute.  Unfortunately, she loves to pull off her headbands now, so we had to go a different route if I wanted her to wear bows with her outfits these days.  Thankfully she has some hair so I decided to make some small bows to clip onto her hair.  :)


These are all around 2 1/2 inches wide, so they don't look too big on her head.  ;)  


This one MIGHT be my favorite, maybe just because I like brown and pink together.


They aren't perfect, but they were fun and easy to do!  :)


Monday, March 28, 2011

Canvas Scripture :)

My sister just had her first baby shower a couple of weeks ago, and I knew that I wanted to do something extra special for her sweet little bundle.  :)  I made STARTED making a cross-stitch birth announcement for my daughter before she was born and considered making one of those for the shower.  Since she's 11 months old, and I STILL haven't finished that, I figured it wouldn't be a good idea to start one for my little nephew.  ;)

I thought of a couple of ideas, and then I saw a painted canvas with the PERFECT scripture.  I immediately decided that this was the idea I had been waiting for... and I can't take credit for it.  Totally God, my friends. ;)  Here's the finished product.


I didn't take any pictures while I was making it, but it wasn't very difficult once I realized how I wanted to do it.  First I sketched up what I wanted on paper, then tried to design it a little on paint.  That's right--I used that super old program that is on every computer because it was all I had.  ;)  Don't worry--I have awesome skills with that program.  I mean, this picture below speaks volumes...


I drew this in '04.. so no, this was not recent, aaaaand I was 20 years old.  What can I say?  Easily entertained.  Don't judge me.  If I was THIS awesome then, you can imagine the talent I have for this program now.  ;)  I was going for the whole "Duck Hunt" (think Nintendo) dog here.  I'm not sure where the lion and deer came from.  I guess I just wanted more animals.  Who knows...

ANYWAY... here is the sketch I made...


This helped me decide which colors to use where, and things like that.  Next, I just used a pencil and ruler to measure the outside line, and then of course, all the other lines.  I didn't have a method for choosing how big the lines should be.  I just chose whatever looked right and made sure they were straight!  ;)

I used acrylic paint, and then just used a paint marker to write the scripture.  I knew it would be WAY too hard to do that with a paintbrush!  It's not perfect, but it was good enough for me.  :)  I'm planning on making one for my daughter out of girly colors, but I haven't decided on a scripture yet.  I want it to be one that she reads over and over again until it's "written on her heart".  :)  Whenever I get around to doing that, I'll post that one as well.

I'm really wanting to open an etsy shop, but I don't know if I have time to do that.  I'm thinking that for now, I may just finish the things I'm trying to make for my daughter (such as her cross-stitch!) and then maybe make a few things for the shop??  I don't know--it sounds super fun, but I also don't want something fun to become a chore...ya know?  Only time will tell... :)

Well, on that note--I hear the princess awakening from her nap.  In the meantime, I have done nothing but wash diapers and blog.  Oh well.  ;)

Have a happy week!!  :)