
Before I had M, as I was
I'm not talking about the kind of cloth diapers that your momma used... (although I'm sure there are still people who still like to use them.)


Being the girly girl that I am, I will admit that I was originally attracted to the idea because of their cuteness. :) My husband and I started researching them and discovered that you can save a TON of money going this route. Yes, you have to pay that first painful amount to buy the cloth diapers, but then, you don't have to keep paying to buy more every other week or so. We ended up getting BumGenius Diapers One-Size Diapers. They are supposed to last through potty-training (one-size adjustable diapers), and we should be able to use them on multiple kids.
We started using the cloth diapers when M was around 4 months old, just because newborns are ALWAYS dirty or wet, plus we had diapers from baby showers. It was a bit of an adjustment at first, but overall I loved them!
I know what you're thinking... "It's SO much easier to just use a disposable". Well, it is easier, but cloth diapers aren't as difficult as you may think.
We originally bought two kinds. The first kind is the BumGenius Organic All-in-One One size diaper, shown below.
We started using the cloth diapers when M was around 4 months old, just because newborns are ALWAYS dirty or wet, plus we had diapers from baby showers. It was a bit of an adjustment at first, but overall I loved them!
I know what you're thinking... "It's SO much easier to just use a disposable". Well, it is easier, but cloth diapers aren't as difficult as you may think.
We originally bought two kinds. The first kind is the BumGenius Organic All-in-One One size diaper, shown below.

I actually thought this kind would be our favorite. It has snaps, which made it seem like it would last longer. It also requires no extra effort. You open the diaper, put it on, or take it off. Sadly, I was disappointed in this style. The snaps are a little difficult, and two of them broke. :( (BumGenius DOES have a one year warranty on their diapers, which you can read more about here.) I was also annoyed with these because M kept leaking in them, and would get a diaper rash. However, this may have been partially our fault. We didn't have our hot water hooked up at the time, so we may not have washed them properly. In the end, we sold them because they weren't working as well as we hoped. I'm sure there are others who like this style, but we just decided to stick with the other style we bought.
The kind that I'm loving now is the BumGenius 3.0 One size pocket diaper (now they have 4.0). It comes with 2 inserts (one small and one big) that you put inside a pocket of the diaper, which absorbs the moisture. I don't have a picture of M wearing this kind, but here is a picture of them. (They have lots of cute colors!)
 |
| Source |
Obviously these have velcro, which is a little easier because it's more like a disposable. I was worried about velcro wearing out faster, and it probably will eventually, but I read here that you can get replacement kits for free. This website is very helpful, and I'm saving it in my favorites for the day I have to replace the velcro!
It absorbs VERY well, and the layer between the insert and M's skin is always dry! It really pulls the moisture away from her skin, which is SO much better. So this is my favorite now! It's a little extra work putting the inserts in, but it's not hard at all. So here is the process, to give you an idea.
What about poopy diapers you ask? Well, yes, those are a bit nasty, but still not too bad. ;) We bought a diaper sprayer off of ebay for a cheap price. They have them for like $40 on some sites, but look on ebay--they're MUCH cheaper.

So when we have a poopy diaper, I just take it to the toilet, turn on the sprayer and spray off as much poop as I can into the toilet. It can be messy if you aren't careful, but I just stick it far down in the toilet to avoid it spraying outside of it. (If you don't already clean your toilet regularly, now is the time to start!) Then I pull out the insert and throw it, along with the diaper into the diaper pail liner (wet bag). (We didn't buy it from this site, but it's the same thing)
 |
| Source |
We keep the wet bag inside a really good trash can to keep M's room from getting stinky. (We're actually jealous of her trash can--she gets all the good stuff) ;) I really don't notice her room being stinky at all until I open the trash can.

Once I'm ready to wash her diapers, I take the wet bag out of the trash can, spray some Lysol in the can, and take the bag to the washing machine.
 |
| Source |
For dirty diapers while we're out, we have a couple of small wet bags. They have cuter ones than these, but these were cheap. ;)

We have 23 diapers I think, so I have to wash them every third day. It's best to use special detergents on them. We bought Country Save detergent originally, and it worked well for a while.

I looked online for tips on how to deal with leaky (and stinky) cloth diapers, and found a lot of info that said the diapers most likely had detergent buildup, so I needed to strip them. I tried using a teaspoon or so of Dawn and washed them several times. Didn't work. I bought some Calgon water softener. Might have helped a little? Not good enough, though. By this time, we were using disposables constantly while looking for a solution. Finally, I found it. :)

Rockin' Green's website talks about how "Hard Rock Detergent" was formulated for use with hard water (they have other formulas for softer water), and when I read reviews, it sounded like the customers had the same problems I was having. So, I decided to give it a shot. Worse case scenario? It doesn't work on our diapers, so I just use it for clothes.
I should probably mention that we have a front loading HE washer, and I don't think those wash diapers as well. To really get the build-up out, you need to soak the diapers. (If I got desperate, I could probably stick them all in the bathtub or something like that.) So, once we received the detergent, we headed to my in-laws home, and washed them there.
The result?
I let them soak with the detergent overnight, and they've been SO much better ever since!! I haven't had any leaking problems! Yay!! :) The diapers are much softer and I can keep them on her longer without them getting very full. I've washed them in our own washer a couple of times since then, and things are still going really well!
I will admit that when I was using disposables all the time, I started hoping that the diapers wouldn't work again, because I figured even if we could get them clean, they would still leak easily. Nope!! I'm loving them again, now! She hasn't leaked at all, except for a time or two at night, when they just got too full. It might work if we double stuffed the diapers, but we decided to stick her in a disposable with some diaper cream, just to make sure her bottom stays healthy. She still does get a little rash sometimes. I'm not sure if that's related or not, but it helps to have diaper cream on it overnight. :)
If you're interested, we bought this detergent off of Amazon here. You know what makes this an even sweeter deal?? You can sign up for Amazon Mom for free, and get FREE Amazon Prime shipping! You can go check out the details at the link. :)
So, I put all the diapers, diaper liners, wipes and the wet bag in the washing machine. I pre-wash without detergent in cold water. Then I do a long cycle with detergent in hot water. Then, I double rinse! Occasionally, I will soak them to make sure I don't get build-up again. I'll probably take them to my parents' house to soak again next time I head that way. ;)
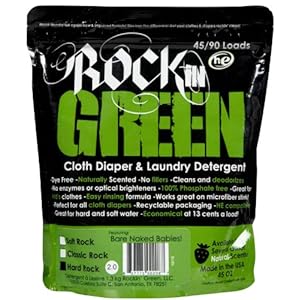
Rockin' Green's website talks about how "Hard Rock Detergent" was formulated for use with hard water (they have other formulas for softer water), and when I read reviews, it sounded like the customers had the same problems I was having. So, I decided to give it a shot. Worse case scenario? It doesn't work on our diapers, so I just use it for clothes.
I should probably mention that we have a front loading HE washer, and I don't think those wash diapers as well. To really get the build-up out, you need to soak the diapers. (If I got desperate, I could probably stick them all in the bathtub or something like that.) So, once we received the detergent, we headed to my in-laws home, and washed them there.
The result?
I let them soak with the detergent overnight, and they've been SO much better ever since!! I haven't had any leaking problems! Yay!! :) The diapers are much softer and I can keep them on her longer without them getting very full. I've washed them in our own washer a couple of times since then, and things are still going really well!
I will admit that when I was using disposables all the time, I started hoping that the diapers wouldn't work again, because I figured even if we could get them clean, they would still leak easily. Nope!! I'm loving them again, now! She hasn't leaked at all, except for a time or two at night, when they just got too full. It might work if we double stuffed the diapers, but we decided to stick her in a disposable with some diaper cream, just to make sure her bottom stays healthy. She still does get a little rash sometimes. I'm not sure if that's related or not, but it helps to have diaper cream on it overnight. :)
If you're interested, we bought this detergent off of Amazon here. You know what makes this an even sweeter deal?? You can sign up for Amazon Mom for free, and get FREE Amazon Prime shipping! You can go check out the details at the link. :)
So, I put all the diapers, diaper liners, wipes and the wet bag in the washing machine. I pre-wash without detergent in cold water. Then I do a long cycle with detergent in hot water. Then, I double rinse! Occasionally, I will soak them to make sure I don't get build-up again. I'll probably take them to my parents' house to soak again next time I head that way. ;)
Last summer I hung the diapers outside every time, but I find that's more difficult to do with an active toddler! Most of the time I throw them in the dryer, but I'm sure it would help with bleaching and sanitizing the diapers if I put them out in the sun. I know it helped get them whiter last year!
We're using cloth wipes as well. We bought a few of them online, but we've discovered that baby washcloths work just as well. We just throw them in with the diapers so it isn't a big deal at all. We got a cheap water bottle, and just put some water in there. You just get your wipe, spray some water on, and there ya go! (I was using a homemade recipe for wipe solution with water, baby oil and soap, but I decided to just use water now) :)
So, all that to say, we're loving them! I highly recommend them if you're wanting to save money over time. (Just be prepared for the painful experience of purchasing them--remember that it'll save money in the long run!) :)
If you have any questions, I'd be happy to (try) and help!! :) Just leave a comment or contact us. :)
Have a fabulous weekend!!

If you have any questions, I'd be happy to (try) and help!! :) Just leave a comment or contact us. :)
Have a fabulous weekend!!


